How to Create Mobile Popups That Convert (Without Hurting SEO)

Do you want to use mobile popups on your website?

Mobile popups can be very effective for lead generation, increasing sales, and getting more app downloads, but you need to design them the right way. Otherwise, you could end up harming your website’s search engine rankings.

In this guide, we will share how to create mobile popups that have high conversion without hurting your SEO rankings.

How Could Mobile Popups Hurt Your SEO?

Mobile popups could harm your WordPress SEO efforts if they go against Google’s guidelines. Google states that sites may be ranked lower in mobile search for using intrusive interstitials or intrusive popups.

If your page has a popup that appears immediately, then Google can penalize that page. This means your page will not rank as high in Google’s search results as it otherwise would have.

Google doesn’t want your popup to cover all or most of the page before the user gets to see the content. These are some examples from Google of what they want you to avoid.

So you might be wondering, then why risk creating popups on mobile?

The short answer is that it helps you increase conversion rates, which results in more leads and sales. This is why many smart business owners and marketers continue to use popups on both mobile and desktop.

The important part is that you must create your mobile popups the RIGHT way so it doesn’t impact your SEO rankings.

How to Create Mobile Friendly Popups That Won’t Hurt Your SEO Rankings

There are several ways to create mobile popups that won’t hurt your SEO rankings. You could:

Create a full-screen popup that only appears after a delay.Create a banner or slide-in that only covers a smaller part of the screen.Only use immediate full-screen popups for legal notices. Examples of these include cookie permissions and age verification popups. These aren’t penalized by Google.

In our example, we’ll cover how to create a full-screen popup that only appears after the user has been on your site for a certain length of time. However, we’ll also share best practices and tactics that you can use to add smart display rules for further optimization.

Creating a Mobile-Only Popup With OptinMonster

OptinMonster is the easiest way to create a mobile-only popup. It’s the most popular lead generation tool on the market and has a powerful WordPress popup builder.

First, you need to visit the OptinMonster website and register for an account. Simply click the ‘Get OptinMonster Now’ button to continue.

While all their templates are mobile responsive, you need the Pro account to unlock mobile-specific display targeting rules.

After registering, you need to install and activate the OptinMonster plugin on your WordPress site. For more details, see our step-by-step guide on how to install a WordPress plugin.

Upon installation, you should see the welcome screen and the setup wizard. Go ahead and click the ‘Connect Your Existing Account’ button and follow the on-screen instructions.

Next, a new window will now open asking you to connect your WordPress website to OptinMonster.

You can click the ‘Connect to WordPress’ button to continue.

Once your OptinMonster account is connected, you are ready to create a mobile popup.

You can head to OptinMonster » Campaigns in your WordPress admin and click the ‘Create Your First Campaign’ button.

You will be taken to the OptinMonster campaign builder, where you can choose a campaign type and template.

Simply leave the Campaign Type set to ‘Popup.’

Next, OptinMonster will show you multiple templates for your popup campaign.

First, click the ‘Device/Mobile’ tab and select the ‘Mobile Specific (Optimized)’ device filter. From here, you can select any template for your campaign.

When you choose a template, a window will open.

Simply enter a name for your campaign and click the ‘Start Building’ button.

The template will automatically load the popup’s optin view in the OptinMonster builder. Customizing the content or adding new items with the drag & drop interface is easy.

You can drag any block from the menu on your left and drop it on the template. For example, you can add an image, button, countdown timer, and more.

Besides that, the plug lets you customize existing elements on the template.

For instance, to change the default text, you just need to click on it and type the text you want to use.

You also need to edit the ‘Success’ view. This will be what users see after they enter their email addresses.

To edit the Success view, simply click on the Success tab at the bottom of the screen.

Once you’re happy with both the optin view and the success view, don’t forget to click the ‘Save’ button at the top of the screen.

Setting the Display Rules for Your Mobile Popup

Now, it’s time to set the display rules for your popup. First, you need to click the ‘Display Rules’ tab at the top of your screen.

The default rule is for your popup to show after users have been on your site for 5 seconds. You can increase this time period if you want.

You can also add other mobile-safe targeting rules to unlock further optimizations such as:

Exit Intent for Mobile – this will only show the popup if the user hits the back button or is about to close the tab.Inactivity Sensor – this will only show the popup after the user has stopped being active on the site for a certain number of seconds.Scroll Trigger Popups – this will only show the popup after the user scrolls down a certain percentage of the page.Button Click by MonsterLinks – this will only show the popup if the user clicks on a specific button.

Your popup uses a Mobile Optimized template. This means it will automatically only display on mobile devices.

Next, you can select the pages on which the popup will appear.

By default, the rule will be set to ‘current URL path is any page.’ This means that your popup will appear on all posts and pages of your site.

You can then click the ‘Next Step’ button.

OptinMonster will then allow you to add an animation and sound effect when your mobile popup appears.

After that, you can click the ‘Next Step’ button.

You will now see a summary of your display rules. At this stage, you can edit your settings and make changes to your campaign.

Next, you can go to the ‘Integrations’ tab and add an email marketing service such as Constant Contact. OptinMonster integrates with most major platforms, so you will just need to select the one you use.

If you don’t have one, WPBeginner readers can get 20% off their first 3 months with Constant Contact.

Simply click the ‘+ Add New Integration’ button from the panel on your left and choose your email marketing tool.

Next, you can go to the ‘Published’ tab at the top.

After that, make sure the ‘Publish Status’ is changed from ‘Draft’ to ‘Publish.’

Don’t forget to click the ‘Save’ button at the top of the screen and close the campaign builder.

Putting Your OptinMonster Campaign Live on Your Website

Your OptinMonster campaign won’t automatically go live on your WordPress website. Instead, you need to log in to your WordPress admin and go to OptinMonster » Campaigns.

You should now see your new mobile popup campaign listed here. Then, click the ‘Change Status’ link below your campaign’s name and select the ‘Publish’ option under the Status column.

Now, your campaign will be live on your WordPress website. Go ahead and view it by going to your site on a mobile device.

Simply wait for the length of time you specified in the display rules, and your popup should appear. Here’s our popup live on our demo site.

Other Types of Mobile Popups That Won’t Harm Your Mobile SEO Rankings

Aside from time-delayed and user interaction popups in OptinMonster, you could create a floating bar, slide-in, or inline option. Google won’t consider these intrusive, so you don’t have to worry about your SEO taking a hit.

A floating bar optin can appear at the top or bottom of the user’s screen, without covering up the content.A popup can slide in from the bottom or side of the website, usually after a time delay.An inline optin can sit within the content itself, part way through a page or post.

Simply select one of these types when you begin building your campaign. You will then see the templates you can use.

We hope this article helped you learn how to create mobile popups that won’t hurt your SEO. You might also like our article on the best WordPress plugins for business websites, and how to choose the best WordPress hosting.

If you liked this article, then please subscribe to our YouTube Channel for WordPress video tutorials. You can also find us on Twitter and Facebook.

The post How to Create Mobile Popups That Convert (Without Hurting SEO) first appeared on WPBeginner.

How to Use AI to Generate Images in WordPress

Do you want to use artificial intelligence tools like DALL.E to generate images in WordPress?

AI-generated images can be a good alternative to generate images for your WordPress blog posts without worrying about copyright.

In this article, we’ll show you how to use AI to generate images in WordPress.

Why Use AI Tools to Generate Images for Your WordPress Website?

There are a ton of paid stock image websites offering images to use on your WordPress website for a small fee.

However, the cost of these images is an extra expense. Most bloggers and small businesses don’t have the budget for that.

There are certainly many websites that offer royalty free images like Unsplash or ShutterStock‘s limited free library.

But those images are highly overused and often too generic.

Now, the best way to create images for your website is by making your own images or using your own photographs. But not everyone is a professional photographer or digital artist.

This is where artificial intelligence comes in.

AI tools like DALL.E can generate unique artwork from text descriptions provided by the users.

These images are not only unique but highly creative and artistic.

For instance, here is an image of an office desk with a sunset backdrop generated by DALL.E 2. It mimics the style of generic stock image photos that you can find on hundreds of websites.

Now take a look at this example of an artwork created by DALLE.2.

This one is artistic, more colorful, and in a comic book style.

You can see the variety of styles, topics, and ideas you can use on the DALL.E homepage.

The best part is that you are free to use these images for your blog posts, articles, and even landing pages.

That being said, let’s take a look at how to easily use AI-generated images in WordPress.

We’ll be showing you two methods using two different AI tools, you can choose one that works best for you.

1. Generate AI Images for WordPress with DALL.E 2

DALL.E 2 is an Artificial Intelligence tool made by Open A.I. It is quite popular for its artistic rendering, surrealism, creativity, and versatility.

There are no plugins available to integrate DALL.E 2 directly with your WordPress website.

However, you can create images on DALL.E 2 website and download them to your computer. After that, you can upload those images to your WordPress website.

First, you need to visit the DALL.E 2 website and sign up for a free account which gives you 50 credits for your first month.

Upon signing up, you’ll see the DALL.E dashboard with a prompt field and some recent artworks generated by DALL.E.

Type a text description of the image that you want to generate in the prompt field. You can be as descriptive and creative as you want.

Click on the Surprise Me button to see some examples of prompts you can generate.

Once you click on the Generate button, the AI will generate images based on the prompt you provided and show you four results.

You can download all of them to your computer if you want. You can also click on any of the generated images to edit them.

The image editor in DALL.E allows you to expand the frame or pan in. You can also erase or retouch an area of the image.

Click on the Generate button again for AI to regenerate the image based on your changes.

Once you have downloaded the images to your computer you can switch back to the admin area of your WordPress website.

You can now upload the image to your WordPress media library by visiting the Media » Add New page.

You can also add an image directly to your WordPress posts and pages. Simply edit the post or page where you want to display the image.

On the post edit screen, add the Image block and then upload the image from your computer.

What is The License Used for Images Generated by DALL.E 2?

You retain the copyright for the images generated by the prompt provided by you to DALL.E 2.

You can use the images anywhere you want including your WordPress website, YouTube videos, eBooks, magazine, and more.

2. Use Imajinn to Generate AI Images in WordPress

For the first method, we’ll be using Imajinn AI to generate images in WordPress.

Imajinn AI is similar to the tools like DALL.E 2, Midjourney, and Stable Diffusion. It generates images using artificial intelligence based on the prompt you provide.

First, you need to install and activate the Imajinn plugin. For more details, see our step-by-step guide on how to install a WordPress plugin.

Note: The base plugin is free and gives you 10 credits. After that, you can buy more credits from the plugin’s website.

Upon activation, you need to visit the Media » Imajinn AI to configure plugin settings and generate images.

First, you need to sign up by providing an email address and password to create your account.

After that, you will be able to start generating images using Imajin AI.

Simply provide a detailed prompt describing the image that you want to generate.

You can also choose from a list of styles, artist style, style modifier filters, and aspect ratio to further customize your prompt.

Below that you can choose to click on the Summon button to launch the Prompt Genie tool.

Based on the prompt description you provided the tool will suggest further prompt ideas to generate the best possible image.

You can click on the generate button to use a suggested prompt, or continue writing your own prompt by copying ideas from the suggestions.

Once you are satisfied, click on the Generate button to continue.

The plugin will now start generating images using the AI tool running on the cloud. Once finished, it will display four variations of images for you to choose from.

Below each image, you’ll find options to share the image, repair faces (The AI is not great at generating human faces), or touch up the image.

You can also just click on the Save button to store an image in your WordPress media library.

To use the image in your WordPress posts and pages, simply edit the post or page where you want to add the image.

On the post-edit screen, add the Image block where you want to display the image and then click on Media Library.

Next, you need to select the image you saved earlier from your Media Library and provide an Alt text for the image.

After that, go ahead and click on the Select button to insert the image.

The plugin also comes with a Imajinn block that you can add to your post or pages and generate an image inside the block editor.

What is The License Used for Images Generated by Imajinn AI?

All images generated by Imajinn AI are provided under the free domain or CC0 license.

You are free to use them on your website as you see fit.

We hope this article helped you learn how to use Artificial Intelligence to generate images for your WordPress website. You may also want to see our ultimate image SEO guide and these easy tips to optimize images for speed.

If you liked this article, then please subscribe to our YouTube Channel for WordPress video tutorials. You can also find us on Twitter and Facebook.

The post How to Use AI to Generate Images in WordPress first appeared on WPBeginner.
How to Create a Simple Event Calendar with Sugar Calendar

Do you want to add an event calendar to your WordPress website?

A calendar is a great way to share in-person and virtual events with your visitors. You can use one to promote your upcoming events, get more people to attend, and help with brand awareness.

In this article, we’ll show you how to easily create a simple event calendar in WordPress with Sugar Calendar.

Why Create a Simple Event Calendar For Your WordPress Website?

By adding a calendar in WordPress, you can show upcoming events to your visitors.

This makes it easy for people to learn about your upcoming webinars, virtual retreats, online sermons, coaching calls, and more. In this way, a calendar can promote your events and encourage more people to attend.

If you have a membership website or a forum, then you can even accept user-submitted events. This is a great way to build a community, attract new visitors, and keep your calendar updated with the latest events. You’ll also save time since you don’t need to research upcoming events and add them to the calendar yourself.

With that being said, let’s see how you can add a simple event calendar to your site.

How to Create a Simple Event Calendar in WordPress

The easiest way to add an event calendar to WordPress is by using Sugar Calendar. It is the best WordPress calendar plugin and has everything you need to create multiple calendars, set start and end times for your events, sync with Google Calendar, and more.

The first thing you need to do is install and activate the Sugar Calendar plugin. For more details, see our step-by-step guide on how to install a WordPress plugin.

Upon activation, head over to the Calendar » Settings page. Here, you can enter your license key into the ‘License Key’ field.

You’ll find this key by logging into your Sugar Calendar account. It’s also in the email you got when you purchased Sugar Calendar.

After that, click on the ‘Verify’ button to check that your license key is valid. Finally, you can click on ‘Save Changes’ to store your settings.

Once you’ve done that, you’re ready to create a calendar by going to Calendar » Calender.

Here, click on the ‘Calendars’ tab.

You can now click on the ‘Add Calendar’ button.

This opens a popup where you can type a title into the ‘Name’ field. Sugar Calendar lets you create multiple calendars, but it only adds a single calendar view to your site. Visitors can switch between the different calendar views using a dropdown menu.

That being said, the ‘Name’ should help visitors tell the difference between the various calendars.

Similar to child pages, you can arrange calendars in parent-child relationships.

Children appear beneath their parents in the WordPress dashboard, so this can be a useful way to organize your calendars. This is particularly true if you have lots of different calendars.

All calendars are parent calendars by default. To create a child calendar, you’ll need to open the ‘Parent’ dropdown and then choose the calendar that you want to use as the parent.

Next, you can add an optional description. Depending on your WordPress theme, this may appear next to the calendar on your website, but not all themes show the calendar description. If you do add a description, then always check that it shows up on your WordPress website.

Finally, you may want to add a color that will appear next to the calendar in your WordPress dashboard. This color-coding can help you group related calendars together, or easily identify a particular calendar.

To add a color, simply click on the ‘Select Color’ switch and then make your selection using the controls that appear.

When you’re happy with the information you’ve entered, click on ‘Add New Calendar’ to go ahead and create your first Sugar Calendar.

You can create multiple calendars simply by repeating the same process described above.

Adding Events in Sugar Calendar

Once you’ve created a calendar, you’re ready to add events to that calendar.

To start, select the ‘Events’ tab and then click on the ‘Add Event’ button.

You can now add all the information about your event, such as date and time, duration, and whether or not it is recurring.

First, you’ll want to go ahead and give the event a name.

Then, add a start time and end date. If the event will last all day, then you can simply check the ‘All-day’ box.

Another option is to set a start and end time, as you can see in the following image.

By default, Sugar Calendar creates all events as one-time events. However, some events are recurring. For example, you might run a webinar every Monday morning or have a monthly meetup for all the volunteers at your nonprofit organization.

To create a recurring event, simply select the ‘Recurrence’ tab, and then choose an option from the ‘Repeat’ dropdown, such as Daily, Weekly, or Monthly.

You can also set an optional ‘End Repeat’ date, which is when the event stops recurring. For example, you might only plan to run webinars until the end of the year.

If you’re organizing an in-person event, then you can also select the ‘Location’ tab and type in where this event will take place.

Next, enter some information about the event in the ‘Details’ box.

This works exactly the same as the WordPress classic editor so you can add images, videos, and formatting.

You can also add a featured image, which will appear on the event’s page. This can make the page more engaging and may also be used in search results and on social media news feeds.

To add a featured image, simply click on ‘Set featured image’ and then either choose an image from the media library or upload a new file.

In the ‘Calendars’ section, find the calendar where you want to add this event.

You can then click to select its radio button.

You can also create a new calendar in this section, simply by clicking on the ‘Add New Calendar’ button.

This adds some settings where you can give the new calendar a name and assign it an optional parent calendar.

Once you’ve entered all the information, just click on the ‘Publish’ button.

You can repeat this process to add more events to the calendar.

Putting Your Events Calendar on Your Website

You can add a calendar to any post or page using shortcode. If you’ve created multiple calendars then visitors can switch between these different calendars using a dropdown.

We’ll add the calendar to a new WordPress page, but the steps will be similar no matter where you’re adding the calendar.

First, go to Pages » Add New in your admin panel. If you want to add it to an existing page, simply click ‘Edit’ under its name on Pages » All Pages.

Then, give your page a title and add any categories and tags that you want to use.

You can then click on the ‘+’ icon to create a new block and type in ‘Shortcode.’ When the right block appears, click on it to add it to the page.

Next, copy the shortcode[sc_events_calendar] into the shortcode block. For more details, please see our guide on how to add a shortcode in WordPress.

You can now publish or update the page to make the calendar live on your website.

To see more information about an event in the calendar, simply click on it.

This will open the event’s page showing the time, date, and any other details.

Sugar Calendar also has a widget that you can add to any widget-ready area of your WordPress theme. This is an easy way to add a calendar to every page of your website or WordPress blog.

The widget also lets you set a default calendar, which will be selected in the dropdown menu. This gives you more control over which events visitors see.

To add a widget in WordPress, simply go to Appearance » Widgets. Here, click on the blue ‘+’ button.

You can then type in ‘Sugar Calendar.’

There are a few different Sugar Calendar widgets, so make sure you select the ‘Event Calendar’ widget.

Now simply drag and drop the widget onto the area where you want to show the calendar.

At this point, you can add an optional title and change the size of the calendar.

To change the default calendar, open the ‘Calendar’ dropdown and then choose an option from the list.

By default, Sugar Calendar will show the current month when the page loads, but you may prefer to show a different month instead. To make this change, simply type a new date into the ‘Default Month & Year’ field.

Once you’re finished, don’t forget to click on the ‘Update’ button. Your Sugar Calendar widget will now show up on your site!

We hope this article helped you learn how to create a simple event calendar with Sugar Calendar. You might also like our article on the best email marketing services and best push notification software, so you can keep your users updated about new events and activities.

If you liked this article, then please subscribe to our YouTube Channel for WordPress video tutorials. You can also find us on Twitter and Facebook.

The post How to Create a Simple Event Calendar with Sugar Calendar first appeared on WPBeginner.
How to Easily Change the Font Size in WordPress

Do you want to change the font size in your WordPress posts or pages?

Sometimes you may want to make a line or a paragraph larger, or you might want to increase the font size on the entire page.

In this article, we’ll show you how to easily change the font size in WordPress posts and themes.

How to change font size in WordPress

Video Tutorial

If you’d prefer written instructions, just keep reading.

Method 1: Using Paragraph Headings

Using headings in your content is a great way to grab user attention with a larger-size font. In most WordPress themes, headings are in a larger font than regular body text. They allow you to break your posts and pages into sections.

Headings are great for SEO as well. Search engines give proper headings more weight than normal paragraph text.

How to add a heading in the default WordPress block editor

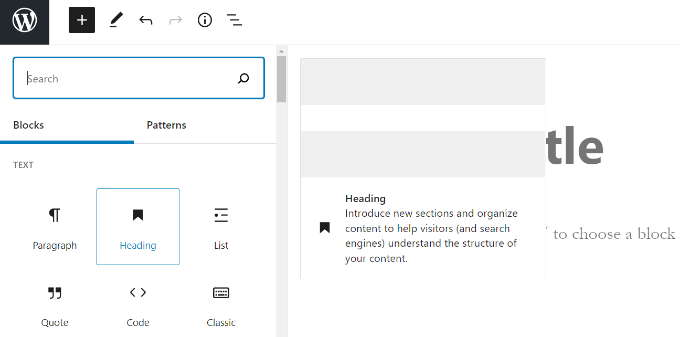
You can add a heading to your posts or pages by simply adding the ‘Heading’ block. You can search for it or find it in the ‘Text’ section in the WordPress block editor.

Add a heading block

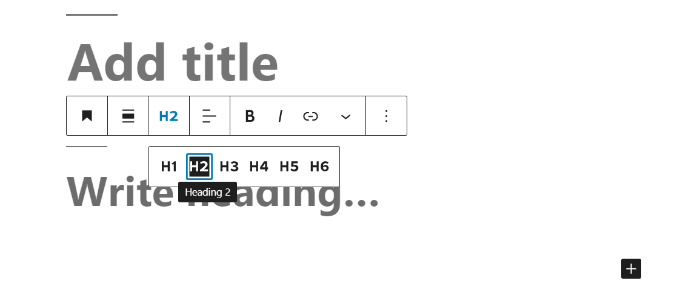
The block will default to Heading 2. Normally, it makes sense to stick with Heading 2 for your subheadings. If you want to change this, then you can simply click on the ‘H2’ drop-down to select a different size.

Change heading from h2

Alternatively, you can change this in the block settings on the right-hand side of the screen. You can also change the heading’s color there as well.

How to add a heading in the older Classic Editor

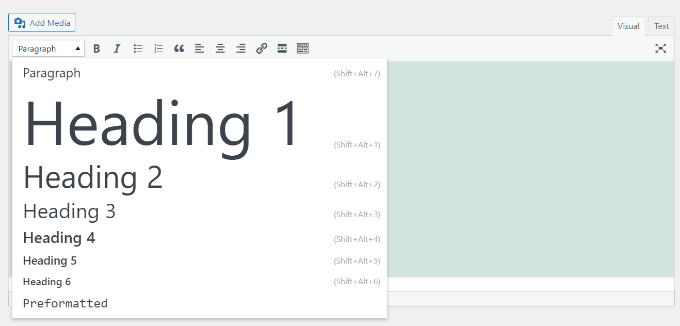
If you are still using the older classic editor in WordPress, then you can add headings using the ‘Paragraph’ drop-down.

Just highlight the text that you want to turn into a heading, click the ‘Paragraph’ drop-down, and select your heading size.

Choose heading in classic editor

The sizes and colors of the different Heading styles are controlled by your theme’s stylesheet (style.css).

If you’re using a premium WordPress theme, then you may have the option to change these settings under Appearance » Customize.

Method 2: Changing the Size of the Text in the Block Editor

What if you want to have a paragraph or even your whole post in a larger font? You can do this easily using the default WordPress block editor.

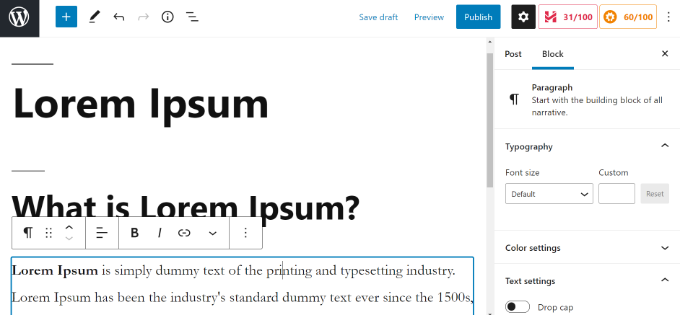
Just click on any paragraph block, then select the font size under ‘Typography’ on the right-hand side.

Typography settings

You can select from the drop-down, which covers Small, Normal, Medium, Large, and Huge. If you change your mind, then just click the ‘Reset’ button to set your paragraph back to the default text.

There’s also a ‘Custom’ option where you can simply type in the pixel size that you’d like. If you want, you can also set a large Drop Cap to appear at the start of your paragraph.

These options aren’t available in the older classic editor for WordPress. If you want to use them, then think about making the switch. Our tutorial on how to use the new WordPress block editor will help you.

If you are determined to stick with the classic editor, then this next option is for you.

Method 3: Change Font Size Using Advanced Editor Tools

Advanced Editor Tools, previously known as TinyMCE Advanced, is a WordPress plugin that gives you more control over font sizes and text formatting, as well as a range of other features.

This is particularly useful with the older classic editor, but it also works with the block editor. It adds a new block called “Classic Paragraph” that has all the formatting controls.

To use it, you’ll first need to install and activate the Advanced Editor Tools plugin. If you’re not sure how to do that, check out our step by step guide on how to install a WordPress plugin.

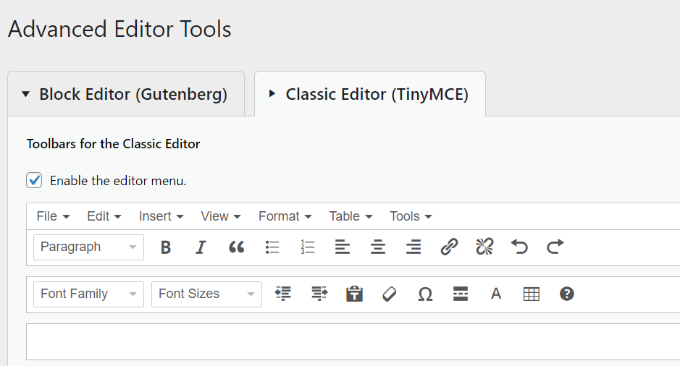
Next, go to Settings » Advanced Editor Tool (TinyMCE Advanced) to configure the editor settings. This is where you can set up the buttons you want to use in the TinyMCE Advanced toolbar.

If you’re using it with the Classic editor, then you should see that TinyMCE has the ‘Font Size’ drop-down enabled by default in the second row of icons.

You can move it to the first row by dragging it upwards if you want.

Advanced editor tools classic editor font size

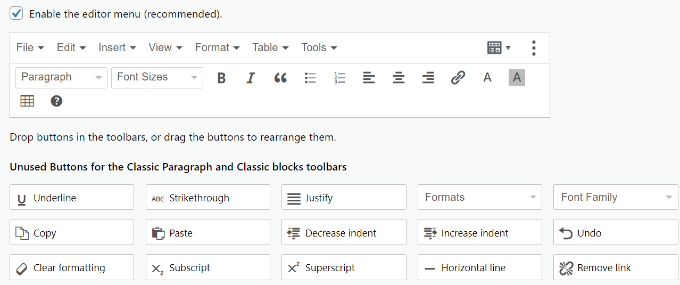
If you’re using the block editor, then you’ll need to scroll down the screen and add the Font Sizes drop-down to the toolbar by dragging and dropping it.

Add font size to toolbar

Make sure you click ‘Save Changes’ at the bottom of the screen.

To see the button in action, create a new post or edit an existing one.

In the block editor, you’ll now have the option to add a ‘Classic Paragraph’ block. It will have the Advanced controls, like this:

Advanced editor tools classic editor font size

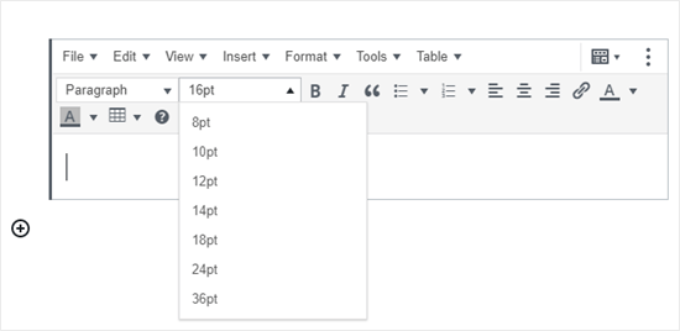
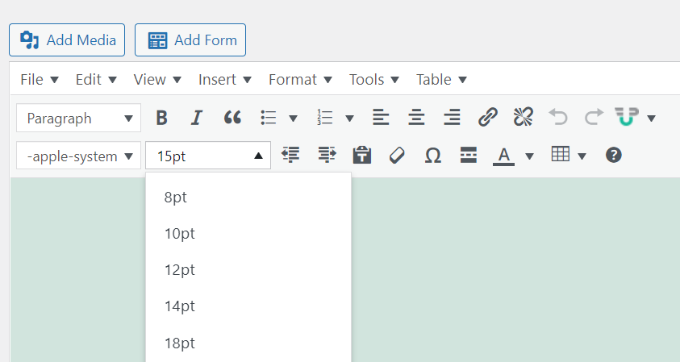
In the classic editor, you’ll see the toolbars with a font size drop-down:

Change font in classic editor

You can select any font size from the drop-down.

Note: this doesn’t give you as many options as the WordPress block editor, and you can’t type in your own font size.

Method 4: Change Site-Wide Font Size Using CSS

If you are changing font sizes every time you edit a post, then you may want to make it easier by changing it permanently in your theme.

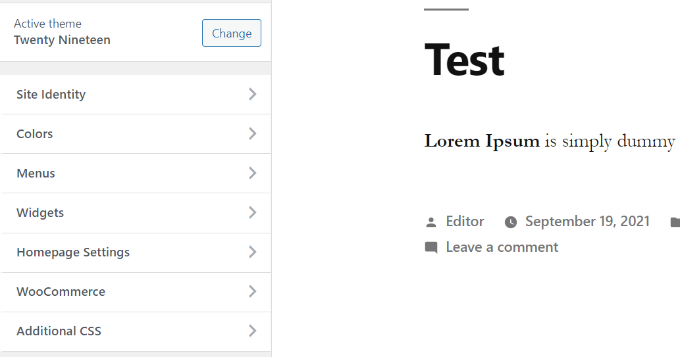
The good news is that you can change the default paragraph size across your whole site. The best way to do this is by using the Theme Customizer under Appearance » Customize.

Some WordPress themes may come with an option for you to change the font size. If you can find this option, then you can use it without writing CSS code.

However, if your theme does not have that feature, then you can add custom CSS to add your own font size rules.

Simply click on the ‘Additional CSS’ option in the theme customizer. This is where you can store all your custom CSS code.

Add additional CSS

Now under the additional CSS text box, simply add your CSS code. In this example, we are changing the font size to ’16px’, you can choose a different font size.

 p { font-size:16px; }

You’ll immediately see the changes on the preview on the right-hand side of the screen. If you’re happy with the font size, click the ‘Publish’ button at the top of your screen to make it live.

Note: Your custom CSS will only be applied to the theme you’re using. If you later choose to switch to a different WordPress theme, you’ll need to copy and paste it into the Customizer again.

The above code only applies to paragraph text. What if you wanted to change the font size of all h2 sub-headings?

Simply modify the above code to target the h2 element in your theme like this:

 h2 { font-size:32px; }

You can do the same thing with other headings as well by simply changing h2 to h3, h4, or h5.

We hope this article helped you learn how to easily change the font size in WordPress. You may also want to see our guide on how to use custom fonts in WordPress or our list of the best drag & drop WordPress page builder plugins.

If you liked this article, then please subscribe to our YouTube Channel for WordPress video tutorials. You can also find us on Twitter and Facebook.

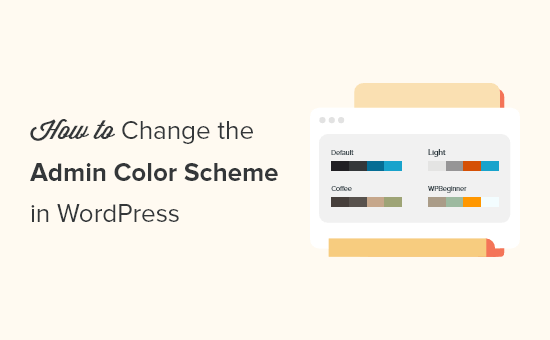
How to Change the Admin Color Scheme in WordPress (Quick & Easy)

Do you want to change the admin color scheme in WordPress?

Changing the color scheme of the WordPress admin lets you create a custom dashboard for you and your team. The color scheme can match the design of your brand, or just feature your favorite colors.

In this article, we’ll show you how to change the admin color scheme in WordPress easily.

How to change the admin color scheme in WordPress

Why Change the Admin Color Scheme in WordPress?

If you’re not a fan of the default admin color scheme in WordPress, then you can easily change the color scheme to something you like.

You can also change the color scheme to match the design of your WordPress theme, or even add a dark mode feature.

This can be useful if you have a membership site or online store where users can log in to your site, and want your website and admin dashboard to offer a similar experience.

You could also use a different admin color scheme for your staging site to more easily tell it apart from your live site.

That being said, let’s show you a few different ways you can change the admin color scheme in WordPress. You can use the quick links below to jump straight to the method you want to use.

How to Change the Admin Color Scheme with WordPress Default Settings

WordPress has a built in feature that lets you choose from a few predetermined color palettes for your WordPress admin dashboard.

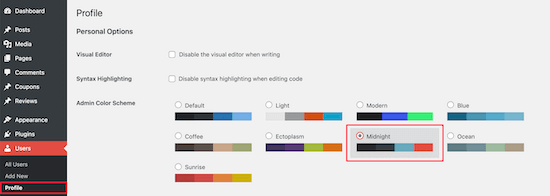
To change the admin color scheme, simply login to your WordPress admin dashboard, and then navigate to Users » Profile.

After that, select the new color scheme in the ‘Admin Color Scheme’ section by clicking the radio button.

Select new admin color scheme

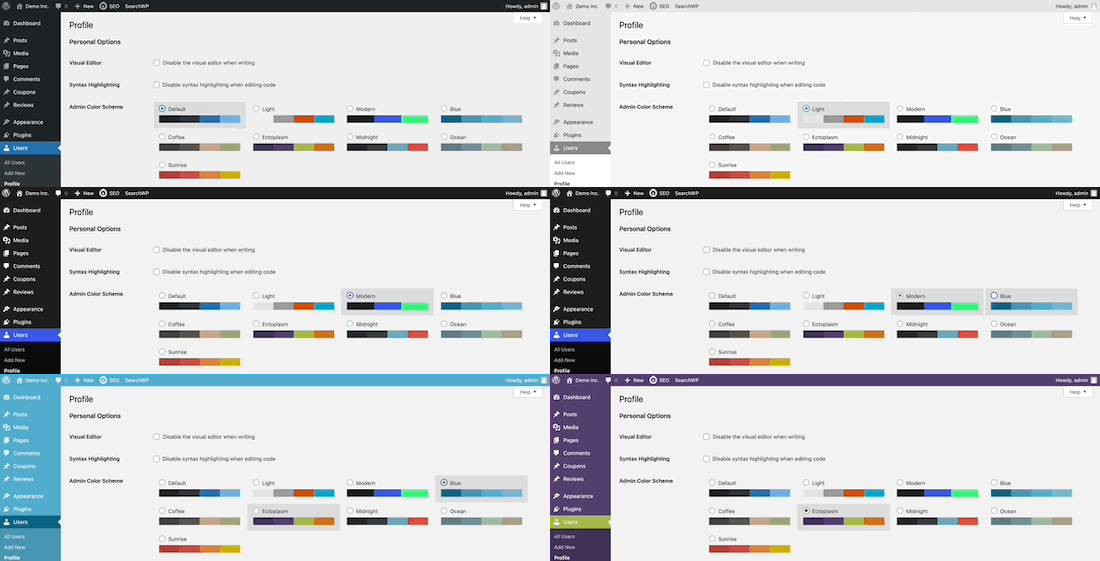
There are 9 different color schemes to choose from.

As you click different options, the color scheme will automatically change.

Admin color scheme change example

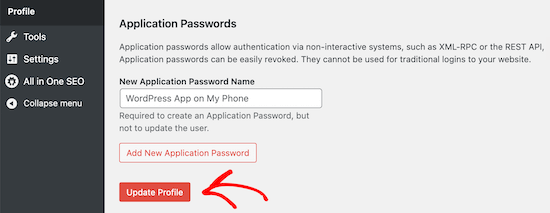
Once you’ve selected a color scheme you like, you need to scroll down to the bottom of the page and click the ‘Update Profile’ button.

Save new admin color scheme

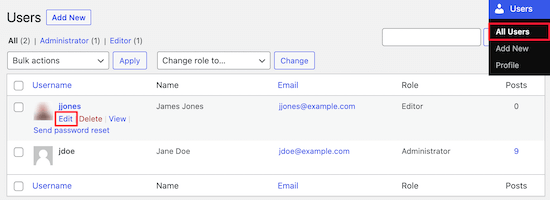
You can also control the admin color scheme for other registered users on your WordPress website.

To do this, go to Users » All Users, and then hover over the user and click the ‘Edit’ button.

Edit user color scheme

Then, simply follow the same process as above to change the admin color scheme for that user.

Once you’re finished, make sure to click the ‘Update Profile’ button at the bottom of the page.

How to Create Custom Admin Color Schemes in WordPress

If you want even more color choices for your admin dashboard, then you can create custom color schemes and upload them to your WordPress blog.

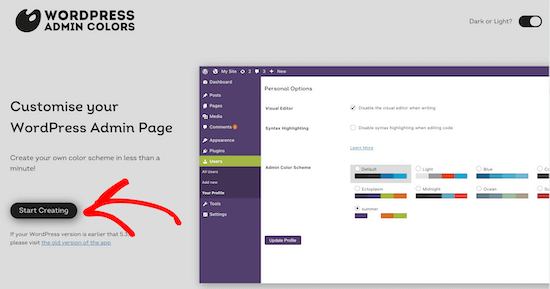
To do this, go to the free WordPress Admin Colors website and click the ’Start Creating’ button.

Click start creating button

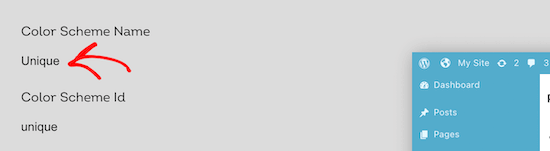
Then, enter a name into the ‘Color Scheme Name’ box.

This name will show up in your WordPress admin panel as a new color option.

Enter color scheme name

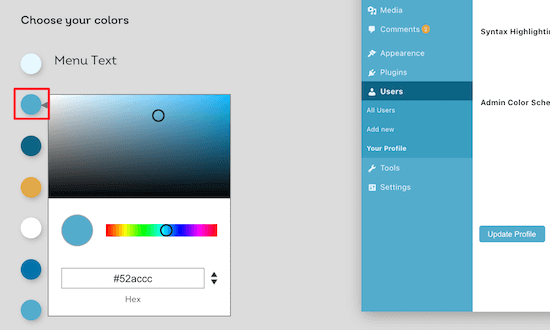
After that, you can fully customize your color scheme by clicking the color options in the ‘Choose your colors’ section.

To change one of the existing colors, click the color and choose your new color from the popup. You can click anywhere on the color picker, or enter a hex code for a specific color.

Click to customize colors

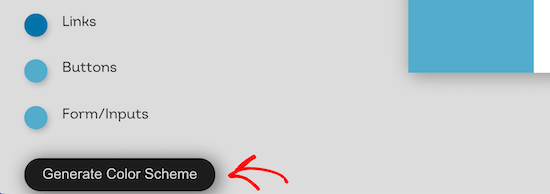
Once you’re finished customizing your color scheme, click the ‘Generate Color Scheme’ button at the bottom of the page.

This will create the color scheme code that you need to add to WordPress.

Click to generate color scheme

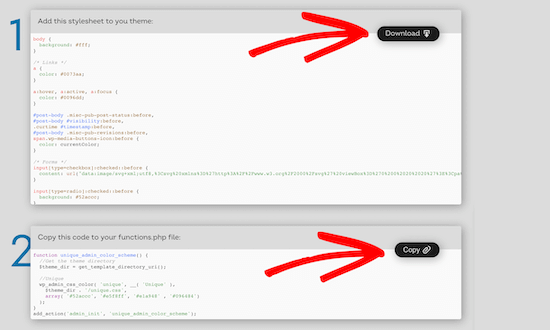
On the next page there will be two different code files.

You need to download the CSS file and copy the code snippet and paste it into your favorite text editor. We will be adding these to your WordPress files.

Download CSS and copy PHP code

If you haven’t done this before, then check out our guide on how to copy and paste code in WordPress.

You can add the code snippet to your functions.php file or by using a code snippets plugin.

For this tutorial, we’ll use the code snippets plugin WPCode. It’s the easiest and most beginner-friendly method of adding code snippets to your WordPress site.

First, you need to install the free WPCode plugin. For more details, see our beginner’s guide on how to install a WordPress plugin.

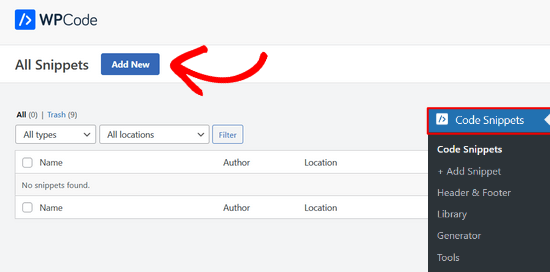
Upon activation, you’ll have a new menu item labeled ‘Code Snippets’ in your WordPress admin bar. Clicking on it will show you a list of the code snippets you have saved on your site.

Since you’ve just installed the plugin, your list will be empty.

Go ahead and click on the ‘Add New’ button to add your code snippet in WordPress.

Click the Add New Button to Add Your First Custom Code Snippet in WordPress

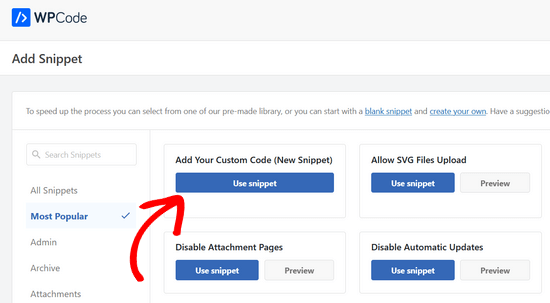
Next, you’ll see the ‘Add Snippet’ page.

Navigate to the ‘Add Your Custom Code (New Snippet)’ option and click on the ‘Use snippet’ button.

Add your new custom code snippet in WPCode

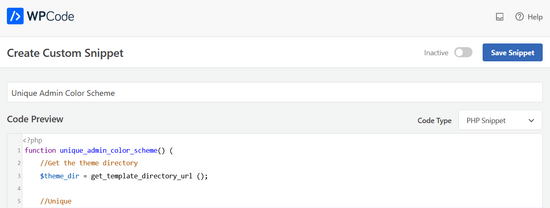
Then, give your code snippet a name. This can be anything to help you remember the purpose of your code.

Now you can paste the snippet you copied above into the ‘Code’ box. You also need to select the ‘Code Type’ from the dropdown list on the right.

Name and add new code snippet

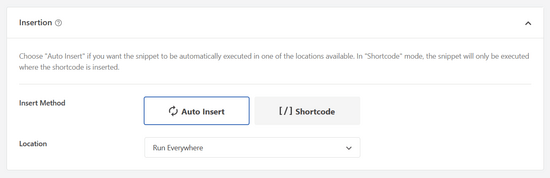
Next, you need to select the insertion method for your code snippet.

You can leave it on the ‘Auto Insert’ method, so it will automatically insert and execute the code snippet in the proper place.

Pick the insertion method for your custom code snippet

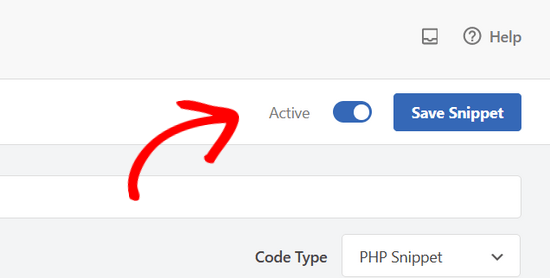
After that, toggle the switch from ‘Inactive’ to ‘Active’ and then click the ‘Save Snippet’ button in the top-right corner of the screen.

This will save the code and activate the new admin color scheme.

Save and activate your custom code snippet

Now you need to upload the CSS stylesheet you downloaded earlier to your theme directory in your WordPress hosting account.

To do this, you can use an FTP client, or the file manager option in your WordPress hosting control panel.

If you haven’t used FTP before, then you might want to check out our guide on how to use FTP to upload files to WordPress.

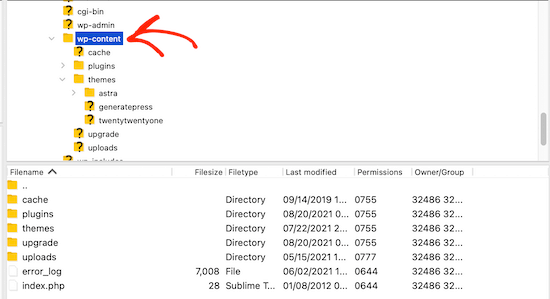
First, you need to connect to your website using an FTP client, or the file manager in cPanel. Once you’re connected, you need to navigate to the /wp-content folder.

Select wp-content folder FTP

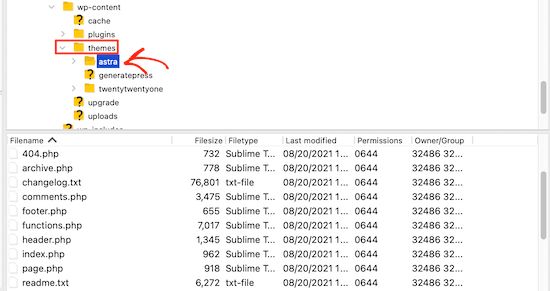
Inside the wp-content folder, you will see a folder called themes. This is where WordPress stores all the themes your website uses or has used in the past.

You need to click on the themes folder, and then open up the folder for the theme you’re using.

Open themes folder and select theme

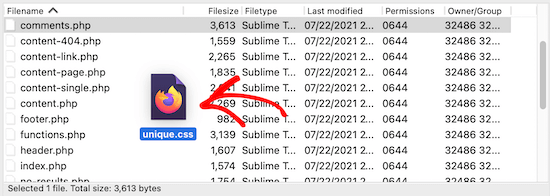
Then, upload the display.css file that you downloaded.

Your CSS file will have the name that you chose earlier.

Upload new CSS file

Note: If you change WordPress themes, then you will need to upload the CSS file to your new theme folder.

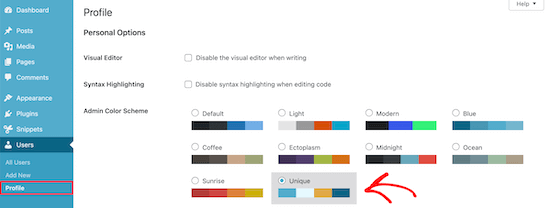
After that, navigate to Users » Your Profile.

Then, you can select the new color scheme you just created.

Select custom color scheme

If you want to use this color scheme, then make sure to click the ‘Update Profile’ button at the bottom of the page.

How to Control the Default Admin Color Scheme for New Users

When a new user creates an account, they’ll have the option to customize their color scheme. But, you may want to control the default admin color scheme or prevent users from changing the color scheme altogether.

The easiest way to do this is by using the free plugin Force Admin Color Scheme.

First, you need to install and activate the plugin. For more details, see our step by step guide on how to install a WordPress plugin.

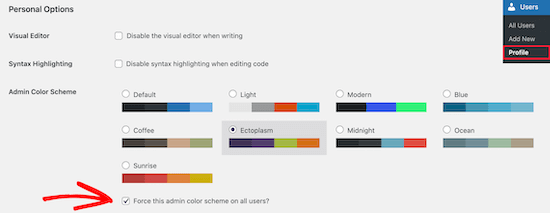
Upon activation, navigate to Users » Profile and then select your admin color and click the ‘Force this admin color scheme on all users’ checkbox.

Check force admin color scheme checkbox

After that, click the ‘Update Profile’ button at the bottom of the page.

Now the default admin color scheme will be the same for all new and existing users on your site.

The plugin also disables the admin color scheme selector for all of your users. The only users who can change this color are those with admin access.

We hope this article helped you learn how to change the admin color scheme in WordPress. You may also want to see our expert picks on the best WordPress landing page plugins and our guide on how to choose the best domain name registrar.

If you liked this article, then please subscribe to our YouTube Channel for WordPress video tutorials. You can also find us on Twitter and Facebook.