Do you want to learn about WordPress files and directory structure?
All core WordPress files, themes, plugins, and user uploads are stored on your website hosting server.
In this beginner’s guide, we’ll explain the WordPress file and directory structure.
Why You Should Learn About WordPress File and Directory Structure?
Most users can run their WordPress website without ever learning about WordPress files or directories. However, understanding how WordPress stores files and directories can help you solve many common WordPress problems on your own.
This guide will help you:
Learn which WordPress files and folders are core files.
Understand how WordPress stores your images and media uploads.
Where WordPress stores your themes and plugins.
Where configuration files are stored on your WordPress install.
Having said that, let’s take a look at the WordPress file and directory structure.
Accessing WordPress Files and Directories
Your WordPress files and directories are stored on your web hosting server. You can access these files by using an FTP client. See our guide on how to use FTP to upload WordPress files for detailed instructions.
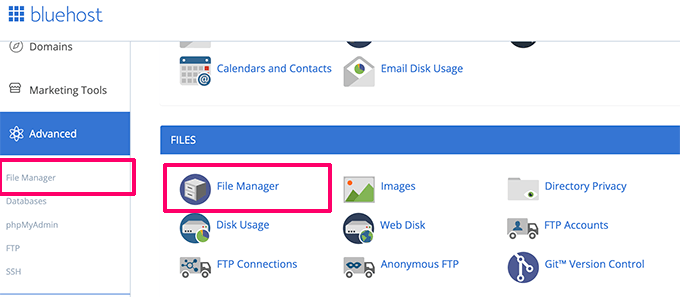
An easier alternative to FTP is the File Manager app that comes built into most WordPress hosting control panel.
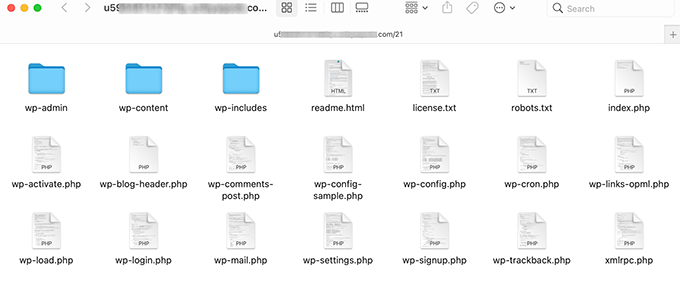
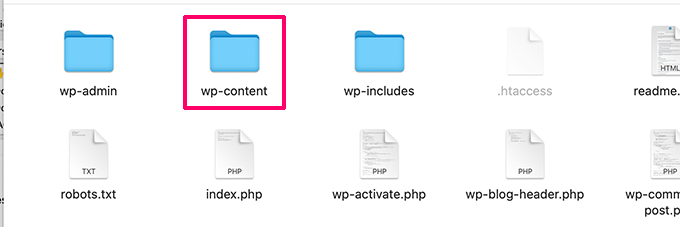
Once you have connected to your WordPress site either using FTP or File Manager, you will see a file and directory structure that looks like this:
Inside the root folder, you’ll see the core WordPress files and folders. These are the files and folders that run your WordPress site.
Apart from .htaccess and wp-config.php files, you are not supposed to edit other files on your own.
Here is a list of core WordPress files and folders that you would see in your WordPress site’s root directory.
wp-admin [dir]
wp-content [dir]
wp-includes [dir]
index.php
license.txt
readme.html
wp-activate.php
wp-blog-header.php
wp-comments-post.php
wp-config-sample.php
wp-cron.php
wp-links-opml.php
wp-load.php
wp-login.php
wp-mail.php
wp-settings.php
wp-signup.php
wp-trackback.php
xmlrpc.php
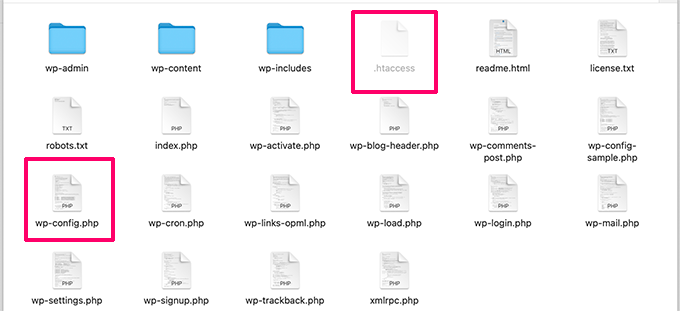
The above list is missing .htaccess and wp-config.php files. That’s because those two files are created after WordPress installation.
WordPress Configuration Files
Your WordPress root directory contains some special configuration files. These files contain important settings specific to your WordPress site.
wp-config.php – This file tells WordPress how to connect to your database. It also sets some global settings for your WordPress site.
index.php – The index file basically loads and initializes all your WordPress files when a page is requested by a user.
You may need to edit wp-config.php or .htaccess file sometimes. Be extra careful when editing these two files. A slight mistake can make your site inaccessible. When editing these two files, always create backup copies on your computer before making any changes.
If you don’t see .htaccess file in your root directory, then checkout our guide on why you can’t find .htaccess file in your WordPress root directory.
Depending on how your WordPress site is setup, you may or may not have the following files in your root directory.
robots.txt – contains instructions for search engines crawlers
Favicon.ico – A favicon file is sometimes generated by WordPress hosts.
Inside The wp-content Folder
WordPress stores all uploads, plugins, and themes in the wp-content folder.
It is generally assumed that you can edit files and folders inside wp-content folder. However, this is not entirely true.
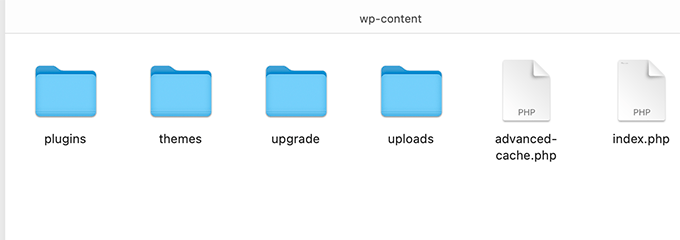
Let’s take a look inside the wp-content folder to understand how it works and what you can do here.
Contents of the wp-content folder may differ from one WordPress site to another. But all WordPress sites usually have these:
[dir] themes
[dir] plugins
[dir] uploads
index.php
WordPress stores your theme files in /wp-content/themes/ folder. You can edit a theme file, but it is generally not recommended. As soon as you update your theme to a newer version, your changes will be overwritten during the update.
This is why it is recommended to create a child theme for WordPress theme customization.
All WordPress plugins you download and install on your site are stored in /wp-content/plugins/ folder. You are not supposed to edit plugin files directly, unless you wrote site-specific WordPress plugin for your own use.
In many WordPress tutorials, you will see code snippets that you can add to your WordPress site.
WordPress stores all your image and media uploads in the /wp-content/uploads/ folder. By default, uploads are organized in /year/month/ folders. Whenever you are creating a WordPress backup, you should include the uploads folder.
You can download fresh copies of WordPress core, your theme, and installed plugins from their sources. But if you lose your uploads folder, then it would be very hard to restore it without a backup.
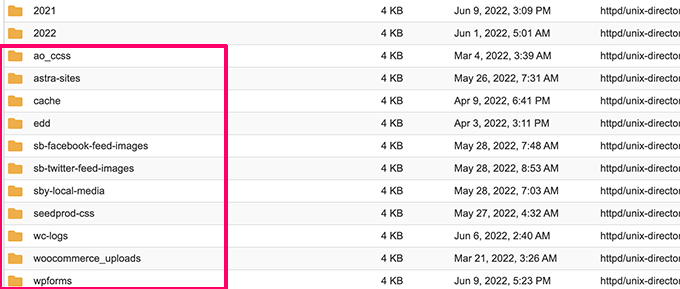
Some other default folders you may see in your wp-content directory.
upgrade – This is a temporary folder created by WordPress during upgrade to a newer version.
Many WordPress plugins may also create their own folders inside your wp-content folder to store files.
Some WordPress plugins may create folders inside the /wp-content/uploads/ folder to save user uploads. For instance, this demo website has folders created by Smash Balloon, WooCommerce, SeedProd, and WPForms plugins.
Some of these folders may contain important files. This is why we recommend backing up all such folders as a precaution.
Other folders may contain files that you can safely delete. For example your caching plugins like WP Rocket may create folders to save caching data.
We are often asked by beginners: what is a domain name and how do domains work? If you are a beginner, then you may have heard that you need a domain to make a website.
However, many beginners confuse domain name with a website or website hosting service. If you are just starting out, then all these different terms may sound too technical.
In this beginner’s guide, we will answer what is a domain name and how domains work. The goal is to help you understand and choose the right domain name for your website.
Here is a quick overview of the topics we will cover in this guide.
Domain name is the address of your website that internet users type in the browser URL bar to visit your website.
In simple terms, if your website was a house, then your domain name will be its address.
A more detailed explanation:
The Internet is a giant network of computers connected to each other through a global network of cables. Each computer on this network can communicate with other computers.
To identify them, each computer is assigned an IP address. It is a series of numbers that identify a particular computer on the internet. A typical IP address looks like this:
66.249.66.1
Now an IP address like this is quite difficult to remember. Imagine if you had to use such numbers to visit your favorite websites.
Domain names were invented to solve this problem.
Now, if you want to visit a website, then you don’t need to enter a long string of numbers.
Instead, you can visit it by typing an easy-to-remember domain name in your browser’s address bar. For example, wpbeginner.com.
How Domain Names Actually Work?
To understand how domain names actually work, we will take a look at what happens when you enter it in your browser.
When you enter a domain name in your web browser, it first sends a request to a global network of servers that form the Domain Name System (DNS).
These servers then look up for the name servers or DNS servers associated with the domain and forward the request to those name servers.
For example, if your website is hosted on Bluehost, then its name server information will be like this:
ns1.bluehost.com ns2.bluehost.com
These name servers are computers managed by your hosting company. Your hosting provider will forward your request to the computer where your website is stored.
This computer is called a web server. It has special software installed (Apache and Nginx are two popular web server software).
The web server now fetches the web page and pieces of information associated with it.
Finally, it then sends this data back to the user’s browser.
How is Domain Name Different from a Website and Web Hosting?
A website is made up of files like HTML pages, website builder software, images, and more. It gives you and your business an online presence.
If the domain name is the web address of your website, then web hosting is the home where your website lives.
This is the actual computer where your website’s files are stored. Such computers are called servers and they are offered as a service by hosting companies.
To create your website, you need both domain name and web hosting. ou need both of them to make any kind of website whether its personal, small business website, or an eCommerce store.
However, it’s important to remember that they are two separate services, and you can buy them from two different companies.
Now you may be wondering, how would it work if you bought them from two separate companies?
You just need to edit your domain name settings and enter the Name Server information provided by your hosting company. Name Server information defines where to send user requests for your domain name.
We recommend getting both your domain name and hosting from the same company. This allows you to easily manage them under the same account.
Domain names are available in many different extensions. The most popular one is .com. There are many other options like .org, .net, .tv, .info, .io, and more. However we always recommend using .com domain extension.
Let’s take a more detailed look at different types of domain names available.
Top Level Domain – TLD
Top level domain or TLD are generic domain extensions that are listed at the highest level in the domain name system. They are also referred to as gTLD or generic top level domains.
There are hundreds of TLDs, but the most popular ones are .com, .org, and .net. Other TLDs are lesser known and we don’t recommend using them. For example, .biz, .club, .info, .agency, and many more.
Country Code Top Level Domain – ccTLD
Country code top-level domain or ccTLD are country specific domain names which end with country code extension like .uk for the United Kingdom, .de for Germany, .in for India.
They are used by websites that want to target audiences in a specific country.
Sponsored Top Level Domain – sTLD
Sponsored top-level domain or sTLD is a category of TLDs that has a sponsor representing a specific community served by the domain extension.
For example, .edu for education-related organizations, .gov for the United States government, .mil for the United States military, and more.
Second Level Domain – SLD
Second level domain generally refers to the name that comes before the top level domain or TLD.
For instance, in wpbeginner.com, the wpbeginner is the second-level domain of the .com TLD.
Domain registries use the SLDs to create a hierarchy for their ccTLD.
For instance, the .au ccTLD, which represents Australia, has com.au, net.au, and more. In this case, the .com is not the Top Level Domain but a sTLD of .au TLD.
Similarly, in the .co.uk domains, .co is the SLD of .uk TLD.
Who is Responsible for Domain Name System?
Internet Corporation for Assigned Names and Numbers (ICANN) manages the domain names system. It is a non-profit organization that creates and implements the policies for domain names.
ICANN gives permission to companies called Domain Name Registrars for selling domain names. These domain registrars are allowed to make changes to domain names registry on your behalf.
Domain name registrars can sell domain names, manage its records, renewals, and transfers to other registrars.
As a domain name owner, you are responsible for telling the registrar where to send requests. You are also responsible for renewing your domain registration.
How to Choose a Domain Name for Your Website?
There are currently more than 350 Million registered domain names and thousands more get registered each day.
This means that all the good ones are already registered or will be registered very soon. This puts a lot of pressure on new users to come up with a domain idea for their website.
We’ve created a free AI-powered business name generator tool that helps you come up with creative company name ideas and check domain name availability status to help you save time.
Here are some quick tips to help you choose a domain name for your next website.
Stick with a .com domain name as it is the most popular, easy to remember, and easy promote.
You can buy your desired domain names from one of the many domain name registrars. A domain name registration typically costs 14.99 per year. Some popular domain name companies are:
However, buying a domain does not automatically give you hosting service. For that, you will need a website hosting account as well.
Many WordPress hosting companies offer domain registration services as well. This allows you to manage both services under one account, and you also don’t need to worry about changing name server settings for your domain.
We recommend using Bluehost. They are offering WPBeginner users a free domain name and 60% discount on hosting. Basically you can get started for $2.75/month.
Frequently Asked Questions About Domain Names
Over the years, we have helped thousands of beginners start their first websites. We have heard almost every possible question about domain names that you can think of.
Following are the answers to some of the most commonly asked questions about domain names.
1. What is a subdomain?
A subdomain is basically a child domain under the main domain name. For example, videos.wpbeginner.com is a subdomain of wpbeginner.com.
Once you register a domain, you have permission to create subdomains for it by yourself.
Websites commonly use subdomains to create child-sites under the same domain name.
For example, a business website can create a subdomain for their blog or their online store as store.example.com or blog.example.com
2. Can I cancel my registration of a domain name?
Some domain registrars allow domain owners to cancel their domain registration at any time. If you cancel your registration, it will become available for others to register.
Other domain name registrars allow you to simply let your domain registration expire.
In most cases, you will not get any refund for the domain registration. However, some domain registrars do have refund policies which you may want to discuss with them before canceling your registration.
If you don’t have the auto-renew feature turned on, then your domain name will simply expire after the registration period you have paid for.
3. Can I move my website to a different domain name?
Yes, you can. You can point your domain name to your hosting server. You can also keep both domain names pointing to the same website.
However, search engines consider it duplicate content and that will affect your search rankings.
Yes, you can sell your domain name. Domain names are like real estate for web. There is a huge demand for good brandable custom domain names.
Trading domain names is a multi-million dollar industry. Since domain names are so cheap, smart entrepreneurs are always looking for great domain name ideas to get their hands own.
If you want to sell your domain name, then there are many marketplace websites like Sedo, GoDaddy, and others where you can list your domain for sale.
Popular registrars like Domain.com and Network Solutions also let you buy premium domains right from their domain search feature.
ICANN requires people registering domain names to provide an email, physical address, phone number, and other personal information to be made available publicly.
Domain Privacy is a separate add-on service sold by domain registrars. It allows you to show proxy information instead of your actual personal info.
You don’t need to buy domain privacy if you don’t want to. However, if you are concerned about privacy, then you can buy this service for a small cost.
6. Can I find out who owns a domain name?
You can use Whois lookup tool to find information about who owns a domain name. However, if the domain name is using domain privacy, then you’ll see the proxy information provided by their registrar.
7. Can I buy more than one domain name?
Yes, you can buy as many domain names as you like.
8. What is www? Is it a part of domain names?
WWW is the abbreviation for the World Wide Web. In the early days of the internet, some experts started using it to indicate that it is a web address.
However, it is not a requirement, and most websites don’t use www in their website addresses anymore.
Technically, www is a subdomain of your main domain name. Anything that comes before your main domain and is followed by a dot is considered a subdomain like videos.wpbeginner.com.
9. What is the Difference Between a URL and a Domain Name?
URL is short for Uniform Resource locator. It is a web address that takes you to a specific page or file on a website.
A domain name alone locates a particular website. If you entered a domain name alone (e.g. wpbeginner.com) in your browser, it will convert it into a URL like https://wpbeginner.com and take you to the homepage of the website associated with that domain name.
Each page or file you see on the internet has a URL associated with it. For instance, you can see the URL for this page in your browser’s address bar above.
10. What is HTTP and HTTPS?
HTTP refers to Hypertext Transfer Protocol. It is the internet protocol technology used to access information on the web.
However, it is succeeded by the HTTPs which indicates Secure Hypertext Transfer Protocol. HTTPs indicates that a website is using SSL, which is a secure protocol to transmit data on the internet.
Right here. WPBeginner is the world’s largest WordPress resource site for beginners. We have tutorials, step-by-step guides, and videos created specifically for beginner users.
Here are some of the helpful resources you’ll find on WPBeginner (All of them are completely free).
How to make a website (step by step guide for beginners)
WPBeginner Videos – Our series WordPress video tutorials for beginners
WPBeginner Dictionary – Our glossary of terms to help you understand the WordPress lingo
WPBeginner Blog – This is where we publish our WordPress tutorials, how tos, and step by step guides.
WPBeginner on YouTube – Need more video instructions? Subscribe to our YouTube channel with more than 126,000 subscribers and 12 Million+ views.
We hope this article helped you learn what is a domain name and how do domains work. You may also want to see our list of best free domain name generators to find cool ideas for your next domain name.
If you liked this article, then please subscribe to our YouTube Channel for WordPress video tutorials. You can also find us on Twitter and Facebook.
Do you want to troubleshoot these WordPress errors on your own? Most of these errors can be solved by following easy troubleshooting steps.
In this beginner’s guide, we will show you how to troubleshoot WordPress errors, step by step.
1. Research Your Error Message
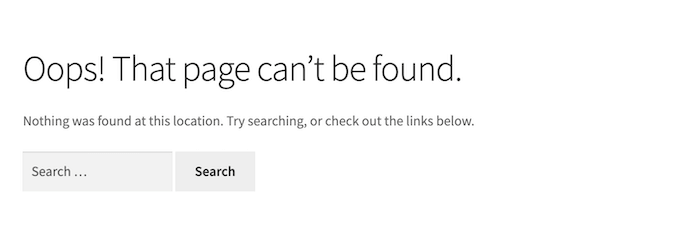
Often when you encounter a problem with WordPress, you’ll get an error message in the tab where you’re trying to access your website, such as the 404 error.
Other times, you may see an error message inside your WordPress admin area, such as the HTTP error that can appear inside the media library.
Every WordPress error is different. If you have an error message, then it makes sense to look for instructions on how to fix this exact error, rather than information on how to troubleshoot WordPress errors in general.
Since you’re on the WPBeginner website, you’re already in the right place to solve all the most common WordPress errors. To start, you can see our guide on the most common WordPress errors and how to solve them.
If your error isn’t on this list, then the next step is to look for articles that mention the error you’re getting.
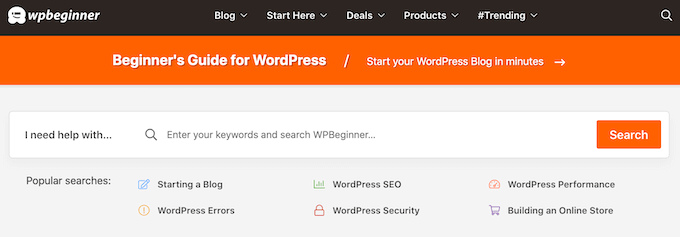
To do this, simply type or paste your error message into the search bar at the top of the page. For example, searching for ‘Error Establishing a Database Connection’ will bring up a complete guide to fixing the database connection error.
WordPress also comes with a debugging system that can log any error messages shown on your site. You can then read through the log to learn more about the problems you’re having on your WordPress website.
Backups allow you to restore your WordPress site easily when something goes wrong. They are your first and most important defense against security threats, hacking, and data loss.
If you are already using a WordPress backup plugin, then make sure that you have a recent backup saved somewhere safe.
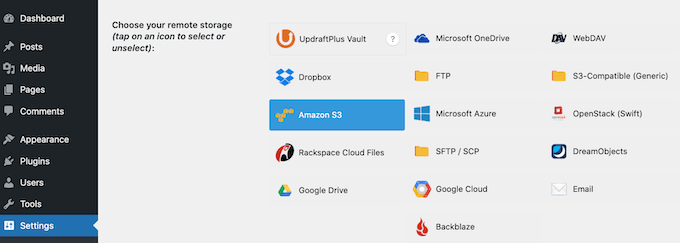
Since backups are so important, we recommend creating more than one copy of your WordPress backups and store it in cloud storage like Google Drive or Dropbox.
Some WordPress backup plugins let you save your files to multiple locations. For example, UpdraftPlus lets you choose between different online storage services, as you can see in the following image.
If you are not already using a backup plugin, then you should start using one now. To help you get started, here’s our expert pick of the best WordPress backup plugins.
If you don’t currently have access to the admin area of your WordPress site, then don’t panic. You can still manually backup your database and files.
3. Clear Browser Cache
A lot of times, your browser may not realize that a WordPress page or post has changed and will load an outdated page from the browser cache. This means you will see an older version of your page or post.
If you’re seeing outdated content, then you may just need to clear your browser cache. This process will vary depending on your web browser. For more details, please see our guide on how to clear browser cache in all major browsers.
Some top WordPress hosting companies like Bluehost and SiteGround also have their own built-in caching software. This can cause you to see a cached version of your website, even if you haven’t installed a caching plugin.
5. Deactivate All Plugins Installed on Your Website
Often errors are caused by plugins conflicting with each other, your theme, or the WordPress core.
The easiest way to troubleshoot these errors is by deactivating all your WordPress plugins. You can then reactivate these plugins one by one, to see when the error happens again.
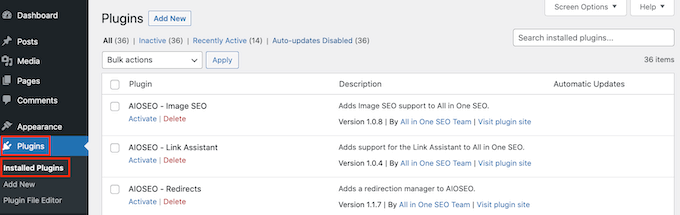
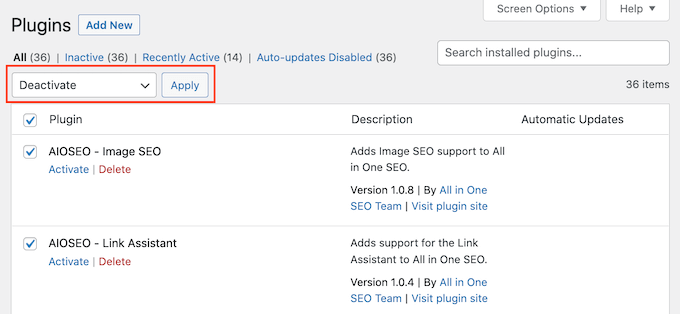
If you have access to the admin area of your WordPress site, then simply head over to the plugins page.
First, you need to select all plugins, and then select ‘Deactivate’ from ‘Bulk Actions’ drop down menu. Click on the Apply button to deactivate all selected plugins.
Some errors may stop you from accessing your WordPress admin area. If this is the case then you can deactivate your plugins using FTP.
After deactivating your plugins, check to see whether the problem is still happening on your website or WordPress blog. If your site is now working perfectly, then you’ll know that the problem is related to a plugin.
You can now simply reactivate your plugins one by one, to see when the problem starts happening again.
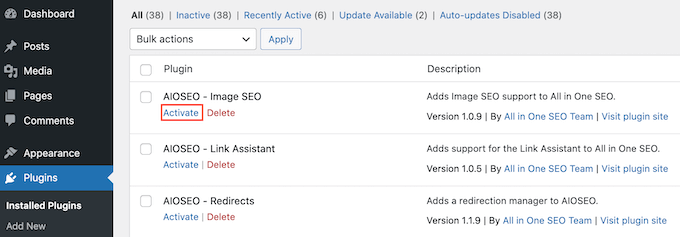
To get started, go to Plugins » Installed Plugins. You can now find the plugin that you want to reactivate and click on its ‘Activate’ link.
Sometimes your WordPress theme can cause issues on your site. To find out if your theme is causing the problem, you can try switching to a default WordPress theme like Twenty Twenty-One or Twenty-Twenty Two.
Since these themes are created by the official WordPress team, they’re less likely to cause conflicts or have bugs compared to some other third party themes.
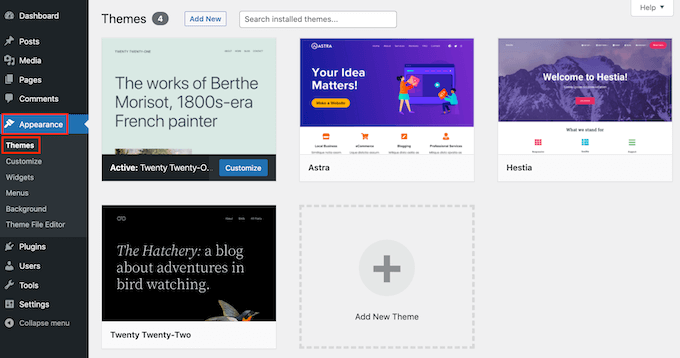
To switch to a default WordPress theme, go to Appearance » Themes.
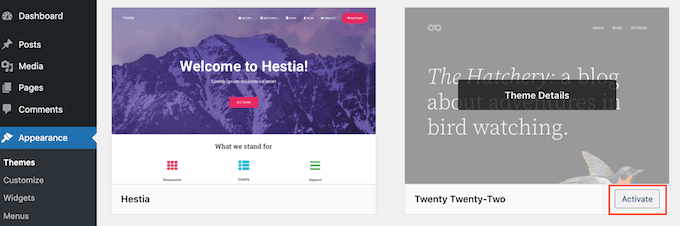
You can then hover your mouse over any of the default themes.
Then, just click on the ‘Activate’ button.
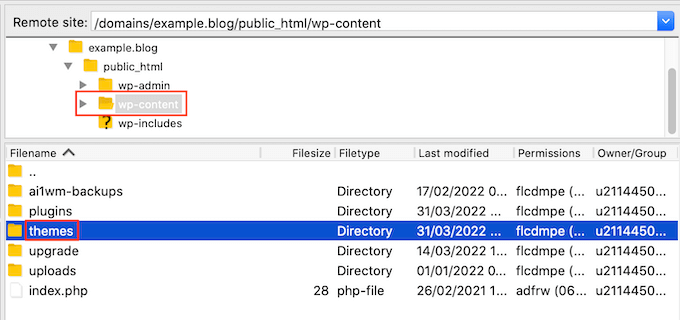
If you can’t log into the admin area of your WordPress site, then you can switch to a default theme using FTP.
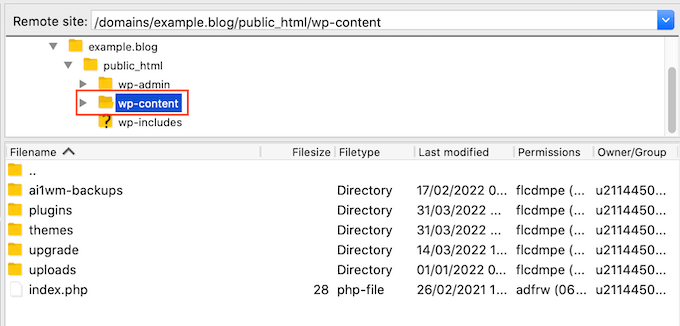
First, connect to your website using an FTP client. Once you’ve done that, head to the ‘/wp-content/themes/’ folder.
Inside this folder, you’ll see all the themes installed on your WordPress website.
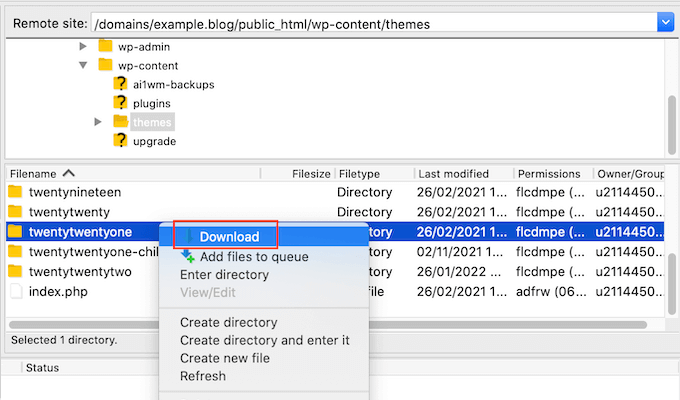
Before making any changes, it’s a good idea to download a copy of your current active theme. This will make it easier to restore your theme after doing this test.
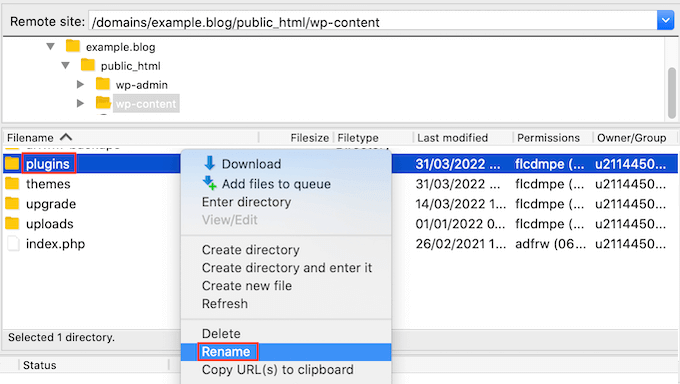
To download your current active theme, simply find the folder that has this theme’s name. Then either Control-click or right-click this folder.
After that we’re going to select ‘Download.’
Once you’ve downloaded this folder, you can go ahead and delete every theme inside your FTP client except a default WordPress theme like Twenty Twenty-Two.
Since your active theme is no longer available, WordPress will automatically switch to using the default theme.
If this solves the error, then you’ll know that your theme was causing the problem.
If this is the case, we recommend finding a new theme for your WordPress website. To help you out, we’ve posted our expert pick of the best responsive WordPress themes.
If this doesn’t solve the problem, then you can restore your original theme. The easiest way is using the copy you downloaded to your computer. For more detailed instructions, please see our guide to using FTP to upload files to WordPress.
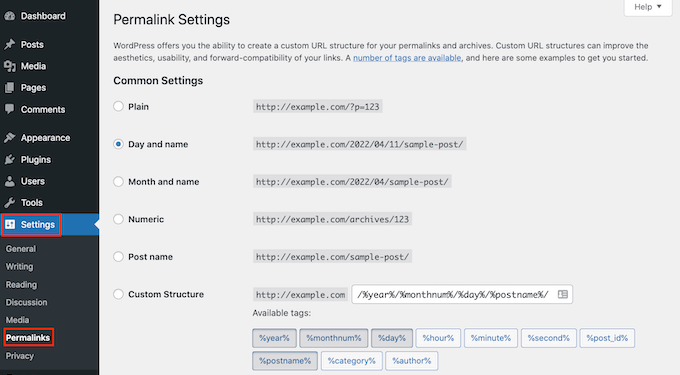
If you’re getting 404 errors, then you can try regenerating your links, which will rebuild and repair your permalink structure. You can do this with the click of a button, and without changing anything on your WordPress website.
To regenerate your permalinks, go to Settings » Permalinks.
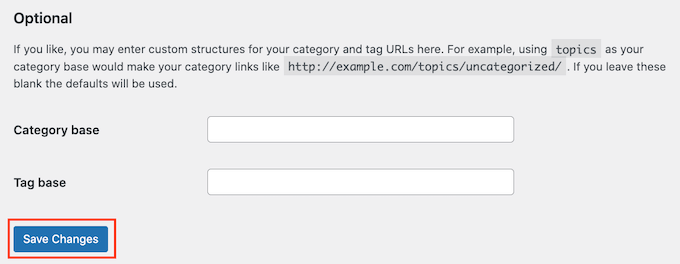
Now scroll to the very bottom of this page and click on ‘Save Changes.’
After a few moments, you should see a message confirming that WordPress has updated your permalink structure.
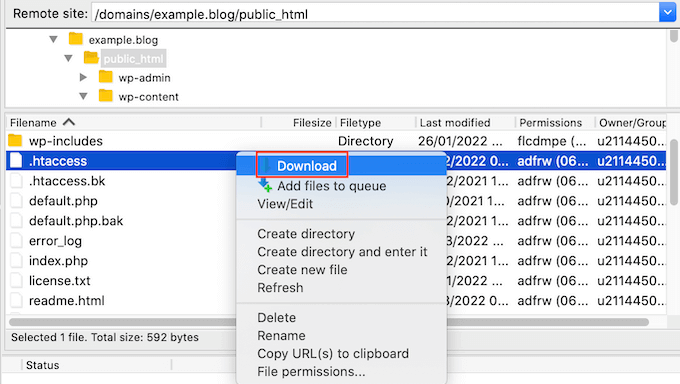
Before doing anything, it’s a good idea to create a copy of your current .htaccess file. Then if anything goes wrong you can simply restore your original file.
To download your .htaccess file, give it a click and then select ‘Download.’
Once you’ve done that, you can go ahead and delete the original .htaccess file in your FTP window. After that, go to Settings » Permalinks in your WordPress admin area.
Finally, click on the ‘Save Changes’ button. WordPress will now go ahead and create a new .htaccess file for your website.
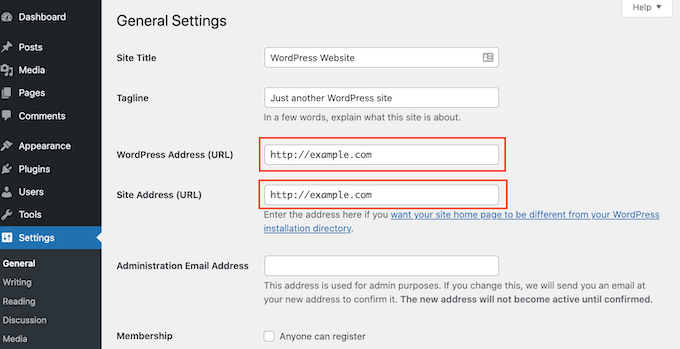
9. Fix WordPress Site URL
If you have the wrong settings for your ‘WordPress Address’ and ‘Site Address’ options, then it can cause redirect issues, 404 errors, and other common problems.
To take a look at your URL settings, visit the Settings » General page.
On this page, find the ‘WordPress Address (URL)’ and ‘Site Address (URL)’ fields.
You need to make sure both of these URLs are exactly the same.
If you can’t access the admin area of your WordPress site, then you can change these URLs using FTP.
After connecting to your site using an FTP client, there are two ways to access these URLs.
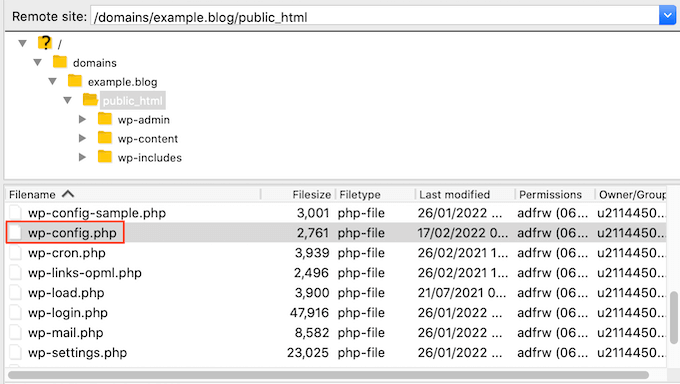
Update WordPress URL and Site URL Settings in wp-config.php File
With this method, you’ll add some code to your site’s wp-config.php file.
You’ll find this file in the root folder of your website along with other folders like wp-content.
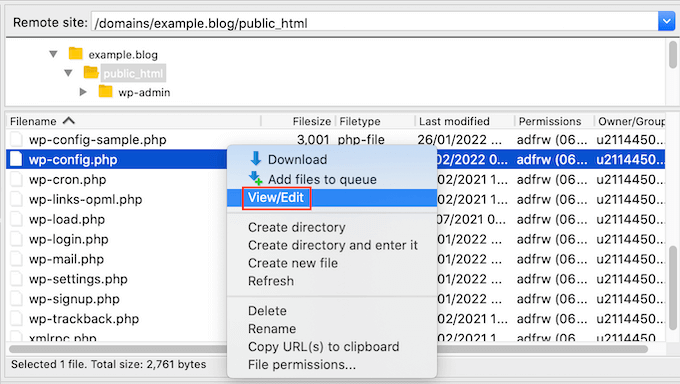
Once you’ve found this file, give it a click and then select ‘View/Edit.’
This will open the file in your computer’s default text editor, such as Notepad.
You can also update these URLs using your theme’s functions.php file.
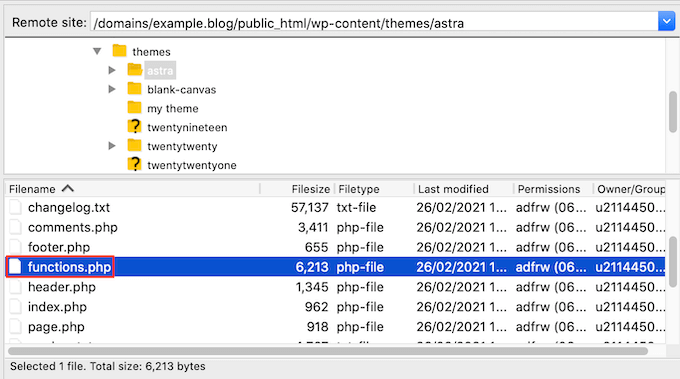
In your FTP client, go to the ‘wp-content/themes/’ folder.
Then, open the folder for your current active theme and find its functions.php file.
Next, you just need to click on the functions.php file and select ‘View/Edit.’ This will open the functions.php file in your computer’s default text editor.
Simply add the following lines at the bottom of the functions file:
You should now be able to access your WordPress admin area.
Once you’re logged in, go to Settings » General. You can now change your ‘WordPress Address (URL)’ and ‘Site Address (URL)’ following the same process described above.
Once you’ve done that, you just need to delete the code that you added to your functions.php file. To do this, simply open the functions.php file following the process described above, and then delete the code.
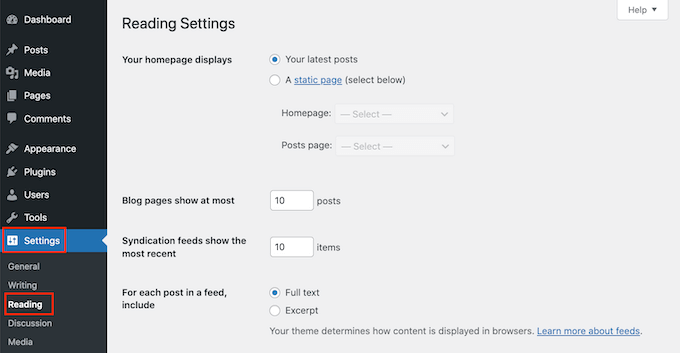
10. Check Reading Settings
If you follow the WordPress SEO best practices, then search engines like Google should find your website automatically.
However, sometimes a newly created WordPress website won’t show up in the search engine results. This may be because your site is hidden from the search engines.
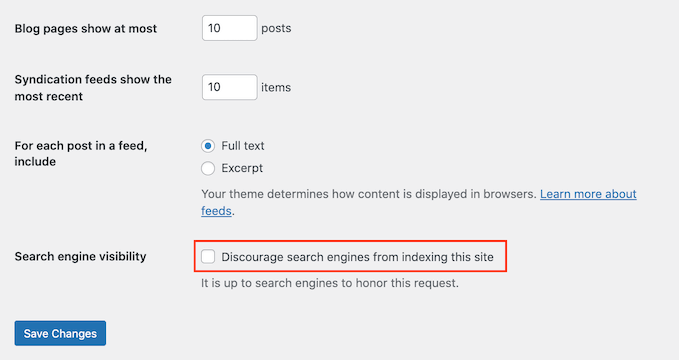
To check your site’s settings, go to Settings » Reading.
Once you’ve done that, scroll down to the bottom of the page and make sure that the box next to ‘Search Engine Visibility’ is unchecked.
This option discourages search engines from indexing your site.
Website owners often use this setting when they’re still working on their site and don’t want their content to show up in search results.
However, you might accidentally check this setting and forget about it.
If you want your site to appear in search results, then make sure this option is unchecked and then click on ‘Save Changes.’
If you’re still working on your site, then you may want to create a coming soon page. A beautifully-designed coming soon page will create a buzz around your website and can even act as a lead generation tool. For more information, please see our guide on how to create beautiful coming soon pages in WordPress.
11. Troubleshooting Email Issues
Some WordPress hosting providers do not properly configure their mail settings. This can stop you and your visitors from receiving emails sent by WordPress.
When reaching out to the community, it’s important to remember that you’re asking people to take their valuable time and answer your question for free. With this in mind, it’s important to:
Be polite and nice. No matter how upset or frustrated you are, do not use harsh or unpleasant language.
Mention your problem briefly. This will make it easier for people to see what the problem is, and decide whether they can help.
Describe the troubleshooting steps you have taken so far. This shows that you don’t just want other people to do your work for free. It also means that people won’t waste their time by suggesting things that you’ve already tried.
Upload screenshots on a cloud image sharing service, and then add the links in your support thread. This can provide a deeper insight into your problem.
We hope this article helped you learn how to troubleshoot WordPress errors. Next, you may want to check out our ultimate WordPress security guide, or see our expert pick of the best WordPress plugins to grow your website.
If you liked this article, then please subscribe to our YouTube Channel for WordPress video tutorials. You can also find us on Twitter and Facebook.
Do you want to learn how to paste snippets from the web into WordPress?
We publish a lot of WordPress tutorials that ask users to add code snippets to WordPress.
Copying and pasting code in WordPress theme files might seem easy for experienced users, but it can be intimidating for beginners.
In this article, we’ll show you how to copy and paste code snippets from the web into WordPress without breaking your site.
Why Add Code Snippets to Your WordPress Site?
WordPress is the best website builder in the world due to the flexibility it offers. It’s super easy to add new features and functionality to your site and can help build nearly any type of website.
We share all kinds of tips and tricks you can use to make your website better. Some of these tips will ask you to add code to WordPress.
While adding custom code snippets to your website is optional, and you can often find plugins to do the same task, sometimes a simple snippet is more efficient.
With that said, let’s take a look at how to add code snippets to your WordPress website safely.
What are the Best Ways to Add Code Snippets in WordPress?
It’s important to mention that before you start adding code snippets to your WordPress website, you should install and use a WordPress backup plugin.
This keeps your WordPress site safe, and you can always restore it from a backup in case anything goes wrong.
When adding snippets to WordPress, you may find instructions to add them to WordPress theme template files, like index.php, single.php, and more.
These snippets are only useful for those specific theme files, so you will have to add them directly or create a WordPress child theme.
However, most code snippets will be added to your WordPress theme’s functions.php file. Some tutorials might recommend adding it directly to the file, but there are much better alternatives that allow you to future-proof your changes.
This way if you ever change a theme, your custom functionality will not be removed.
There are different ways to edit WordPress files depending on which method you choose to add custom code snippets to your WordPress blog or website.
With that said, let’s take a look at some of the most beginner-friendly ways to add custom code snippets in WordPress.
Method 1: Adding Custom Code with the WPCode Plugin (Easy)
Using a code snippets plugin is the safest and most beginner-friendly way to add code to WordPress.
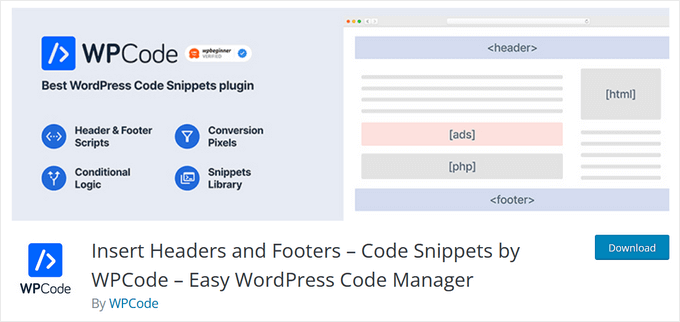
The WPCode plugin lets you add and manage custom code snippets on your website easily, without having to edit your theme files.
It comes with smart code snippet validation to help you prevent common code errors. This protects you from breaking your website when adding code snippets.
WPCode also has a built-in code library that makes it easy to find all of the most popular WordPress code snippets. You can add these expert-written code snippets in just a few clicks.
The best part is that it lets you manage all code snippets from one central screen, and you can even organize them using tags.
Note: The WPCode method is useful for snippets that need to be added to the functions.php file. If you are asked to add a code snippet in other theme files, then this method will not work.
How to Edit and Add Code to WordPress with WPCode
If you’re going to use the WPCode plugin to add code to WordPress, then you’ll be adding code directly in your WordPress admin dashboard.
First, you need to install and activate the plugin. For more details, see our beginner’s guide on how to install a WordPress plugin.
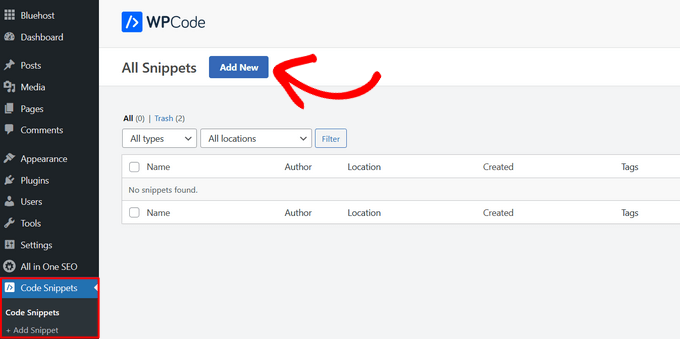
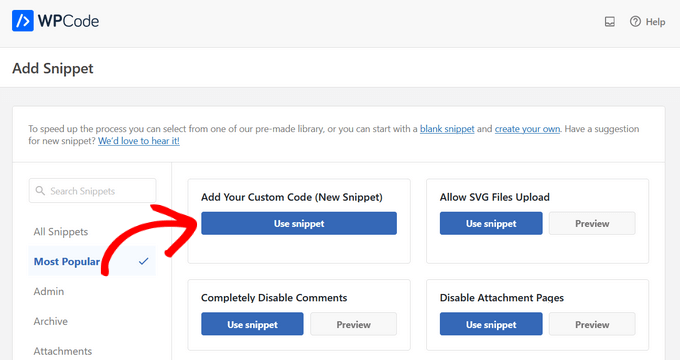
Upon activation, simply go to Code Snippets » + Add Snippet in your WordPress admin dashboard. Then, click the Add New button.
This brings you to a screen where you can choose a snippet from the pre-made library or add your custom code.
To add custom code, click on the Use snippet button under the ‘Add Your Custom Code (New Snippet)’ option.
On the next screen, start by giving your snippet a name to help you remember it. Then, paste your code into the box. Be sure to choose the correct code type from the drop-down menu on the right.
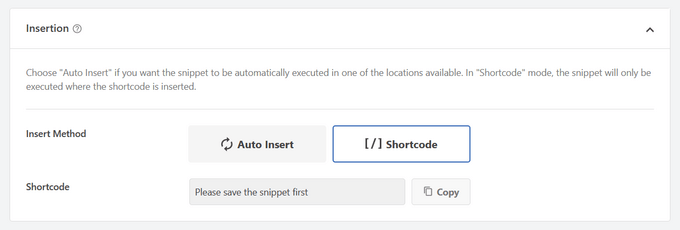
Next, scroll down to the ‘Insertion’ section. Here you can choose to use the code snippet as a shortcode that you can manually copy and paste anywhere on your site. Or, select the ‘Auto Insert’ method to choose a location (WordPress function) where the code snippet will be automatically inserted.
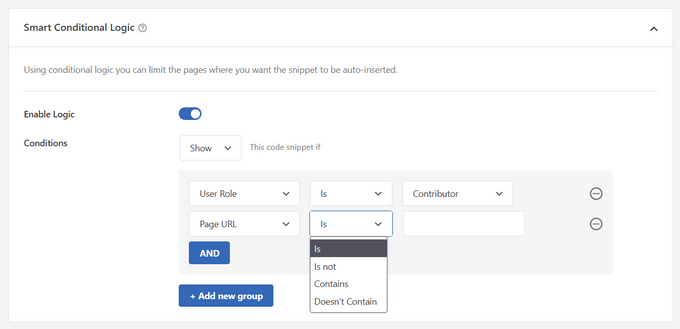
The best part about WPCode is that aside from the various Auto-Insert options, it also comes with beginner-friendly conditional logic option. This lets you select when your code should load.
Once you’re done adding the code, toggle the switch from ‘Inactive’ to ‘Active’ in the top right corner.
Then click the Save Snippet button.
Once the snippet is active, it will be added automatically or displayed as shortcode, depending on the insertion method you chose.
Sometimes you may only need to add code to your theme’s header.php or footer.php files. The WPCode plugin can also help you do this easily.
This comes in handy when you need to add a tracking code for Google Analytics, Facebook Pixel, Google AdSense, and more to your website.
Plus, it lets you manage all of your header and footer codes in one place, prevents any manual errors, and lets you upgrade or change your theme without worries.
Note: This method works best for tracking scripts, custom CSS, and Javascript code.
Go to Code Snippets » Header and Footer and then enter your code snippet into the header, body, or footer, section of your website.
Make sure you click the ‘Save Changes’ button, and your code snippets will be live on your website.
Method 2: Adding Custom Code in Site-Specific WordPress Plugin
Another flexible option is to use a site-specific WordPress plugin. This is a custom plugin that you can create for your own website and use to save all your custom code.
The advantage of this method is that your code is not dependent on your theme, and it will remain active even when you change themes. It is also not affected by any WordPress updates on your website.
Note: This method is only applicable for code snippets that need to be added to the functions.php file.
If you’re using a site-specific plugin, then you can use the built-in WordPress plugin editor to add your custom code.
First, you’ll need to go to Plugins » Plugin Editor and then select your plugin from the drop-down menu labeled ‘Select plugin to edit:’.
The editor will load your site-specific plugin. Then, you can simply add code to the page.
Once you’re finished, make sure to click on the ‘Update File’ button to save your changes.
If something is missing in your code or can break your website, then the plugin editor will automatically undo your changes.
Method 3: Adding Custom Code to Functions.php or Other Theme Templates
Finally, it is okay to add code snippets directly to your theme’s functions.php file. However, we recommend using the other options above, since there are some downsides.
First, if you update your WordPress theme, then all of your changes will be gone.
Next, the code you added will only work if you are using that particular theme.
That being said, let’s take a look at how to properly copy and paste code snippets and avoid breaking your website.
If you are adding code snippets directly to your theme’s functions.php file or any other page template, then you can add the code by navigating to Appearance » Theme Editor in your WordPress admin panel.
Then, you can select the file from the right-hand column, and it will open up in the editor.
The tutorial you’re following will tell you where you can add the code snippet, but if not, then you need to add the code at the bottom of the file beneath all the code that’s present.
Another alternative is to use FTP of your WordPress hosting file manager to add custom code to your theme files.
Simply connect to your FTP client to your website and then go to wp-content » themes » your-theme-folder and right-click on the file that needs editing.
Then, click the ‘View/Edit’ option to open the file in the text editor and add your code snippet.
Troubleshooting PHP Errors when Adding Custom Code
There are some common mistakes that beginners make when adding custom code snippets to their WordPress websites. Luckily, most of these errors can be avoided and fixed easily.
Let’s take a look at these errors and the best ways you can fix them.
1. Incorrect Usage of PHP Begin and End Tags
WordPress is written mainly in the PHP programming language which has a specific syntax that tells your server that the following code needs to be processed by PHP. Here is what a typical PHP code snippet looks like:
// PHP Begin Tag <?php // Rest of the code goes here // PHP End Tag ?>
All your PHP code needs to be inside the <?php and ?> tags.
The PHP end tag is very important in files that switch back and forth between PHP and HTML. This includes most WordPress theme files that use PHP tags alongside HTML.
You need to make sure that if you are pasting your code at a location where the PHP start tag is not closed, then you need to add your code without the starting PHP tag.
<?php // Some pre-existing code // your custom code ?>
If you are pasting your custom code outside or after the PHP end tag, then you need to add the PHP begin tag as well.
<?php // Some pre-existing code ?> // Your custom code snippet <?php ?>
Almost 90% of all errors are caused by the incorrect placement of PHP start or end tags. Looking at your code will help you understand whether or not you need to add the PHP start or end tags in your custom code snippet.
However, many WordPress theme files like functions.php may not have a PHP end tag at all. This means that you can add your code at the bottom of the file without the start or end tags.
Here’s an example of what that looks like.
<?php // Lots of code in your theme's functions.php file // // // Your custom code function custom_loginlogo() { echo '<style type="text/css"> h1 a {background-image: url('.get_bloginfo('template_directory').'https://cdn.wpbeginner.com/images/login_logo.png) !important; } </style>'; } add_action('login_head', 'custom_loginlogo');
Remember that some tutorials may assume that you already know how to use PHP start and end tags. So, they may simply show you a code snippet without those tags in place.
function custom_loginlogo() { echo '<style type="text/css"> h1 a {background-image: url('.get_bloginfo('template_directory').'https://cdn.wpbeginner.com/images/login_logo.png) !important; } </style>'; } add_action('login_head', 'custom_loginlogo');
Sometimes when code snippets are given they can be added to multiple locations, so the PHP end and start tags won’t be included.
When you are adding such a code snippet in your theme files, you need to make sure that it is inside the PHP tags.
2. Incorrect Nesting Errors
PHP has a particular syntax for functions, conditional logic, and loops. This syntax depends on curly brackets which indicate when a function begins and when it ends.
For example, here is a simple PHP function:
<?php function wpbeginner_tutorial() { echo "Hello World!"; } ?>
Now if you want to add a custom code snippet that has nothing to do with this function, then you will need to put it outside this function like this:
// Pre-existing code in your theme file <?php function wpbeginner_tutorial() { echo "Hello World!"; } // Your custom code function custom_loginlogo() { echo '<style type="text/css"> h1 a {background-image: url('.get_bloginfo('template_directory').'https://cdn.wpbeginner.com/images/login_logo.png) !important; } </style>'; } ?>
If you miss the starting or ending curly brackets, then this will break the code, and you will end up with an error page.
Understanding PHP Errors in WordPress
Errors that are caused by adding custom code to WordPress will often result in a detailed error message. Most of them are syntax errors, parse errors, or fatal errors due to unexpected characters.
The good news is that these errors will tell you which line in your code caused the error.
Then, you can then go to the exact line to review the code and figure out what you missed.
For this, we recommend using a proper text editor for code editing because they have line numbers and syntax highlighting which can help you fix the issue easily.
What to do When Your WordPress Site is Inaccessible?
First of all, take a deep breath and don’t panic. All of your website’s files are still there and you can access them.
Simply connect to your website using an FTP client or the file manager app in cPanel in your WordPress hosting account.
Next, locate the file where you added the code that caused the error and open it to edit it.
Then, you can try and fix the issues with the code snippet. If you are unable to fix those issues, then simply remove the code snippet you added and save your changes.
Now, your site should be back to normal again. If it is still showing some error, then download a fresh copy of your WordPress theme and extract the zip file to your computer.
After that, locate the file where you made the changes earlier, and upload it to your server while overwriting the old file.
Do you want to create 301 redirects on your WordPress website?
When someone visits your site using an old link to a page that has moved, a 301 redirect will automatically take them to the new page so they do not see a 404 ‘page not found’ error. This provides a better user experience and will also improve your keyword rankings.
In this article, we’ll show you how to create 301 redirects in WordPress.
What Is a Redirect in WordPress?
A redirect is a way for your WordPress website to automatically send users to a new address when the page they wish to visit has been moved or replaced. This is similar to the way a post office will redirect your mail when you move house.
There are various types of redirects that are identified with numbers such as 301, 302, and 307. They automatically point your user’s web browser to a different URL when trying to visit a page that doesn’t exist.
In this beginner’s guide, we will focus on 301 redirects since they are the most important type. They tell the browser that the page has been permanently moved to the new location and that you don’t intend to move it back.
That said, let’s take a look at when you should use a 301 redirect.
When Do You Need a 301 Redirect in WordPress?
The primary reason to use a 301 redirect is when your site or a page on your site has been moved, and you want to point the user to a new page instead.
If you don’t set up redirection, then it will cause your users to see a 404 error when the page is not found. This provides a bad user experience and can impact your WordPress SEO.
You can also lose valuable backlinks if there are a lot of broken links on your site. This will result in a significant drop in your domain authority and keyword rankings.
That’s why 301 redirects are very important. They allow you to tell search engines and your users that the page they are trying to reach has been permanently moved to a new location.
This way, all your old page’s traffic and backlinks are transferred to the new page.
Now, let’s take a look at how you can create 301 redirects in WordPress. We’ll show you how to do that easily with several WordPress redirect plugins, and manually using code.
The simplest way to manage and create 301 redirects is through the All in One SEO (AIOSEO) WordPress plugin. It’s the best SEO plugin for WordPress and is used by over 2 million professionals to improve their site’s SEO.
AIOSEO offers a powerful redirection manager addon that makes it very easy to find broken links on your website and set up 301 redirections to fix them.
Note: You’ll need AIOSEO Pro to use the redirection manager. There is also a free version of AIOSEO, but it doesn’t include 301 redirects.
First, you need to install and configure the AIOSEO Pro plugin on your website. For more information, please refer to our step-by-step guide on how to set up All in One SEO correctly.
Once the plugin is active, you’ll need to go to All in One SEO » Redirects on your WordPress dashboard and then click the ‘Activate Redirects’ button.
Next, you can click the ‘Settings’ tab and select ‘PHP’ as the Redirect Method.
This is the simplest method for creating redirects and doesn’t require any server-side configuration.
AIOSEO also lets you select the Web Server redirect method. However, it requires configuring Apache or NGINX on your web server. This requires technical knowledge and is not recommended for beginners.
Creating 301 Redirects
Now you’re ready to create 301 redirections. To get started, head over to the ‘Redirect’ tab.
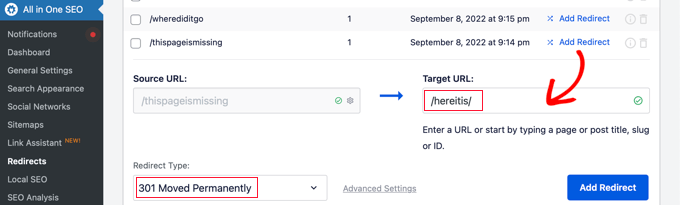
First, you need to enter the link you’d like to redirect in the Source URL field. After that, you should enter the new destination for the link in the Target URL field.
Now make sure that the Redirect Type is ‘301 Moved Permanently,’ and then click the ‘Add Redirect’ button.
If you want to redirect multiple URLs to a new location, then simply click the ‘Add URL’ button under the Source URLs field.
Next, you can scroll down to view the logs of the redirects you’ve created. It shows the number of people who visited the redirected link under the ‘Hits’ column and a toggle option to enable or disable individual 301 redirects.
To turn this option on, you have to scroll down to the ‘Redirect Logs’ section of the Settings tab. Then enable the options for ‘404 Logs’ and ‘Redirect Logs.’
You can also select the time period to keep the logs. We recommend keeping them for a maximum of one month for smooth and fast server performance.
After enabling these options, make sure to click the ‘Save Changes’ button.
You should now see a new ‘404 Logs’ tab appear in the Redirects section. This is where AIOSEO will track and show your broken links and allow you to set up redirections. You’ll also see the number of visits to the link under ‘Hits’ and the last accessed date and time.
Note: You won’t find any data when you first enable the 404 logs. The plugin only starts to record 404 error pages after the setting is enabled.
Next, click the ‘Add Redirect’ link next to 404 error URL you’d like to redirect. This is not the button at the bottom.
You’ll now see options to enter a Target URL and select the Redirect Type from the dropdown menu.
Go ahead and enter your new URL and choose ‘301 Moved Permanently’ as your redirection type. Now you should click the ‘Add Redirect’ button.
AIOSEO will now create a 301 redirect for your broken link. To see if the redirection is working properly, simply visit the old URL to check if you’re taken to the new target destination.
Adding 301 Redirects Directly From a Post or Page
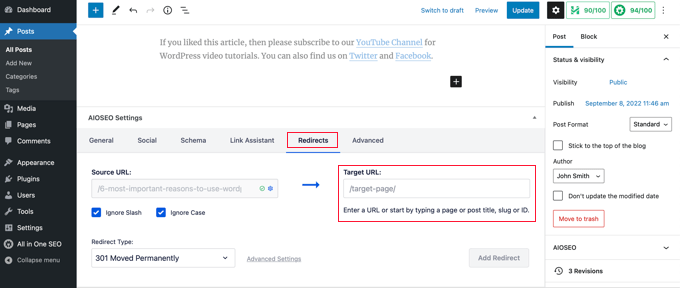
AIOSEO also lets you redirect a published post or page while you are editing it.
If you scroll to the bottom of the page in the WordPress editor, you will find an AIOSEO Settings section. You need to click on the ‘Redirects’ tab.
The source URL has been filled in for you. Simply enter the new URL in the ‘Target URL’ field, and select ‘301 Moved Permanently’ from the Redirect Type drop down menu.
Also, if you change the permalink of a post while editing, AIOSEO will offer to redirect the old URL to the new one.
Either way, click the ‘Add Redirect’ button and you’re done.
Redirecting Full Websites
If you move your website to a new domain name, then your visitors may encounter broken links and your site SEO may suffer.
You can use AIOSEO to move your entire website to a new location without losing traffic or search engine rankings. This is a full site 301 redirect.
Note: While setting up 301 redirects using a WordPress plugin is easy, it has some minor performance setbacks. Depending on your WordPress hosting provider, your redirects may be a few microseconds slower than other methods.
If you want to make your redirects as fast as possible, then you can do so by editing your .htaccess file using Method 5 below.
Once activated, visit Tools » Redirection and then click the ‘Start Setup’ button.
Next, you can select options to monitor permalink changes in WordPress and keep a log of all your redirects and 404 errors.
You can simply enable these options and click the ‘Continue Setup’ button.
The plugin will now automatically test the Rest API.
When the status comes back as Good, go ahead and click the ‘Finish Setup’ button.
The redirection plugin will perform a few more tasks to complete its setup. When the progress bar reaches 100% you can click the ‘Continue’ button and then the ‘Ready to Begin’ button.
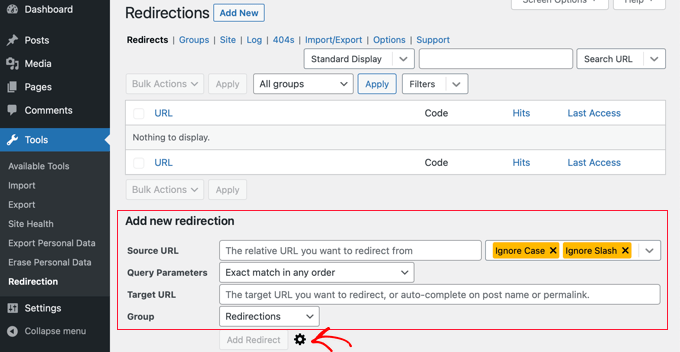
The plugin is now ready for you to create your 301 redirects. To get started, navigate to the Tools » Redirection section of your WordPress panel. You should look at the ‘Add new redirection’ section at the bottom of the screen.
You’ll see the basic settings to add a redirection. However, if you click the gear icon, you’ll see more options to choose your redirection type.
Simply enter the Source URL of your old page and add the ‘Target URL’ you want to redirect to. You should also make sure the HTTP code option is set to ‘301 – Moved Permanently.’
Once you’ve entered all the details, go ahead and click the ‘Add Redirect’ button.
After that, you need to visit Settings » 301 Redirects. Here you can enter the old URL in the ‘Request’ field and your target URL in the ‘Destination’ field.
Once you’ve done that, click the ‘Add New’ button to create the 301 redirect. That’s it.
Simple 301 Redirects will begin working immediately.
Sometimes you may want to keep a post in your site’s feed or a page listed a certain way on your site, but have the content hosted elsewhere. This is where the Page Links To plugin comes in handy.
When you press ‘Update’ or ‘Publish,’ WordPress will treat the post or page as normal, but when someone visits it, they will instead be redirected to the custom URL you chose.
For example, you might have a blog where you occasionally create downloadable content, but you want users on your online store site to see certain posts as products. You can use this plugin to do that without risking duplicate content penalties from Google or splitting your user base.
Method 5: Creating 301 Redirects Manually Using .htaccess
WordPress users can also set up 301 redirects by editing the .htaccess web server configuration file.
Please keep in mind that a small mistake in your .htaccess code can make your WordPress site inaccessible, and it may start showing the Internal Server Error.
That’s why it is important that you back up your .htaccess file before making any changes.
Edit Your .htaccess File Using the All in One SEO Plugin
If you have the All in One SEO plugin installed, then it offers an easy way to edit your .htaccess file.
Simply visit the All in One SEO » Tools page and switch to the .htaccess Editor tab.
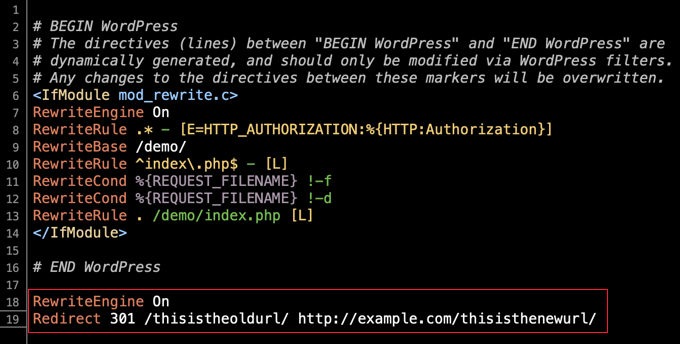
From here, you’ll see the contents of your .htaccess file in the editor. You can simply place any redirect code that you want to add at the bottom, after the ‘# END WordPress’ line.
Here is a simple redirect where we are trying to send a user visiting an old post to a new post.
RewriteEngine On Redirect 301 /a-very-old-post/ http://yoursite.com/a-very-new-post/
Don’t forget to change the old post and new post URLs. When you’re done, click the ‘Save Changes’ button to store your settings and All in One SEO will update your .htaccess file.
Directly Edit Your WordPress .htaccess file
You can also edit your WordPress .htaccess file directly to set up any redirects.
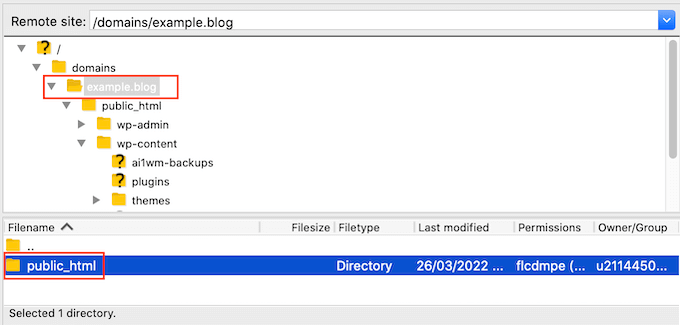
To edit your .htaccess file, you’ll need to connect to your website using an FTP client. The .htaccess file resides in your WordPress site’s root directory.
You can download .htaccess to your computer and edit it using a text editor like Notepad.
You can use this redirect code below to send a user visiting an old post to a new post. You should paste the code at the end of your .htaccess file, after the ‘# END WordPress’ line.
RewriteEngine On Redirect 301 /a-very-old-post/ http://yoursite.com/a-very-new-post/
Make sure you change the old post and new post URLs. After that, you can save your changes and upload the .htaccess file back to the server.
Now you can test your redirect to make sure it is redirecting properly as you intended.
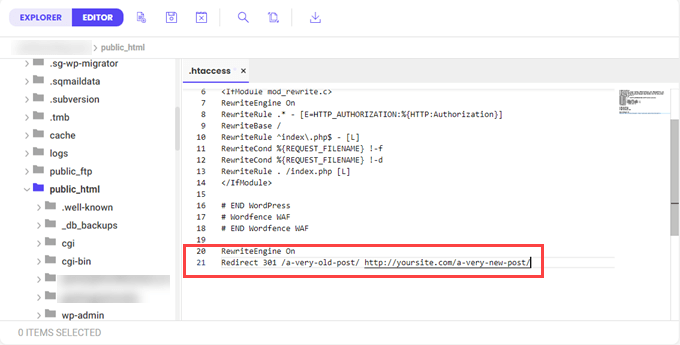
In addition, you can also access and edit your .htaccess file through your hosting provider’s dashboard and built-in file manager.
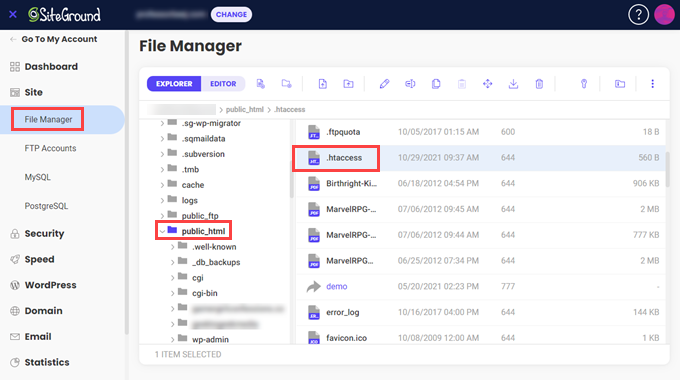
For example, you can find your .htaccess in SiteGround‘s file manager by going to Site Tools »Site »File Manager and navigating to your site’s /public_html/ folder.
Then, you can right-click the .htaccess file and select ‘Edit.’
Just add the 301 redirect code directly and save the file. Again, be sure to download the original .htaccess file for backup to be safe.